
|
|||||||
| S80 '98-'06 / S60 '00-'09 / V70 & XC70 '00-'07 General Forum for the P2-platform S60 / V70 / XC70 / S80 models |
 Information
|
|
Guide to replace rear brakes on S60/V70Views : 59899 Replies : 72Users Viewing This Thread : |
 |
|
|
Thread Tools | Display Modes |
 May 2nd, 2009, 23:35
|
#1 |
|
VOC Member
Last Online: Jun 7th, 2020 11:28
Join Date: Jan 2006
Location: ????????????????
|
Hi Folks,
Just thought I pass on my experiences today at renewing rear discs,pads and shoes on my S60 2003.Took me a little longer than expected but all was worthwhile in the end. 1) Raise vehicle and for your safety use axle stands as extra support,I placed my wheel underneath also as I am abit too paranoid.Release handbrake and chock front wheels. 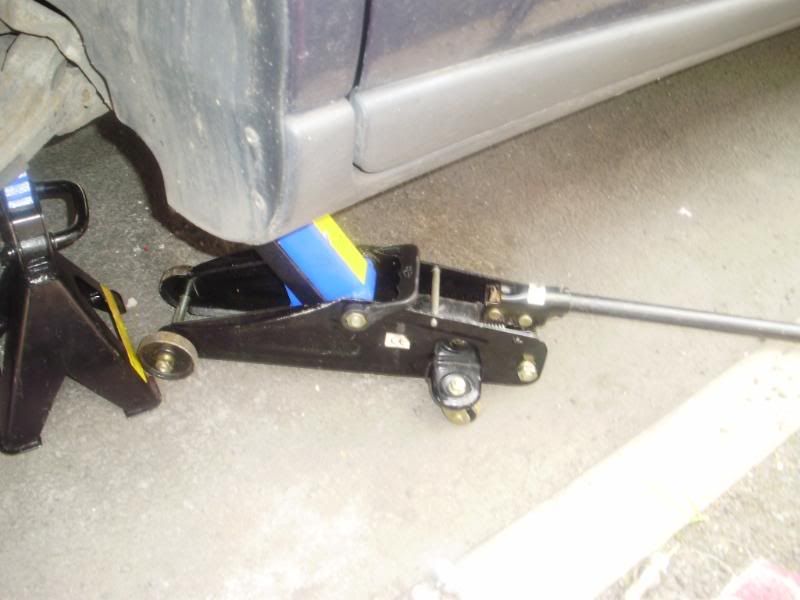 2) Remove wheel and take picture just so that you can remember how the rattle spring is fitted,Should look something like this. 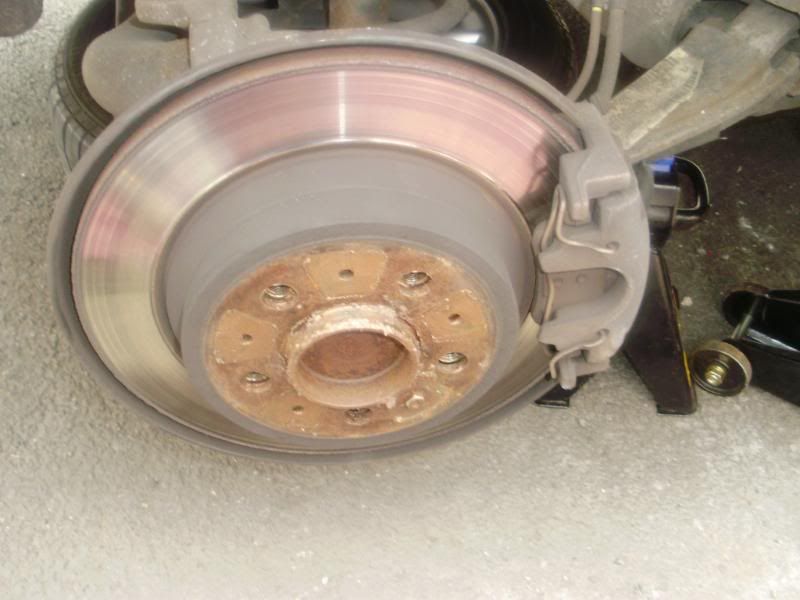 3)Remove Rattle spring and then remove dust caps on piston slide bolts,Using 7mm Hex key (Allen key) undo the slide bolts. 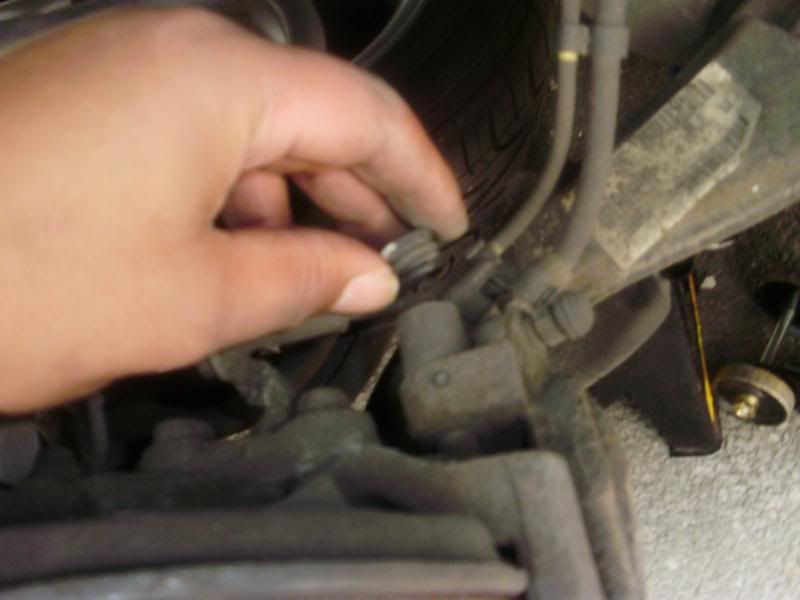 4) Once slide bolts are removed you will be able to slide away caliper from carrier,leave pads intact for now.Using wire (or garden twisty in my case ) hang caliper on suspension in order to reduce stress on brake hoses. 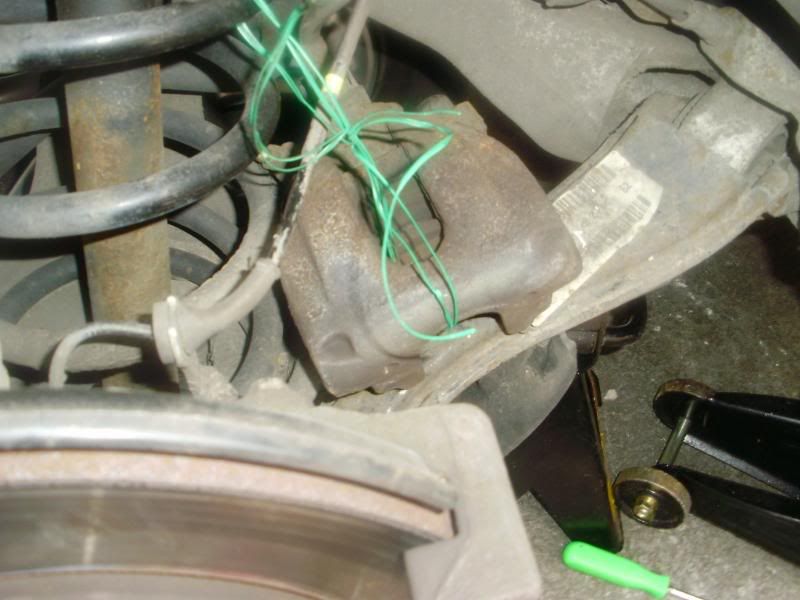 5) Using 13mm socket and rachet begin to remove caliper carrier bolts,Meanwhile taking care not to damage the rear wheel sensor,The wire for sensor can be removed from bracket should it be getting in the way. 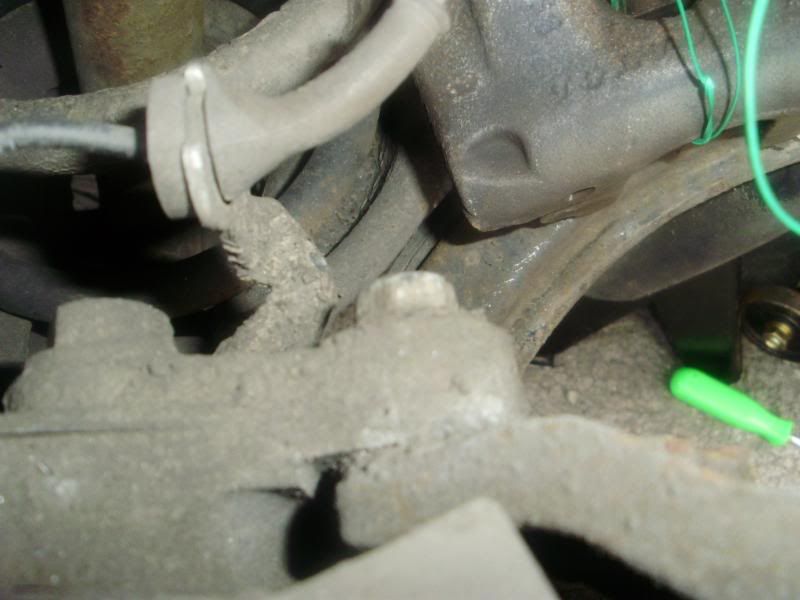 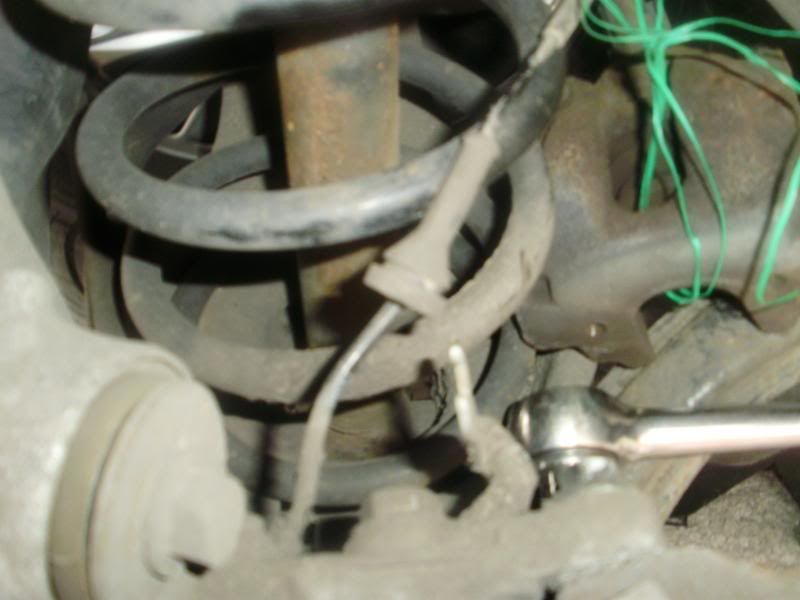 6) Once carrier if off you can begin to remove disc,Mine was stuck firm so i had to use a large rubber mallet to encourage the disc.once disc if off this is what you be seeing,At this point I was a little disapointed at a certain main dealer for reporting my brake shoes where completely naff,As you can see from pic below they are anything but naff. 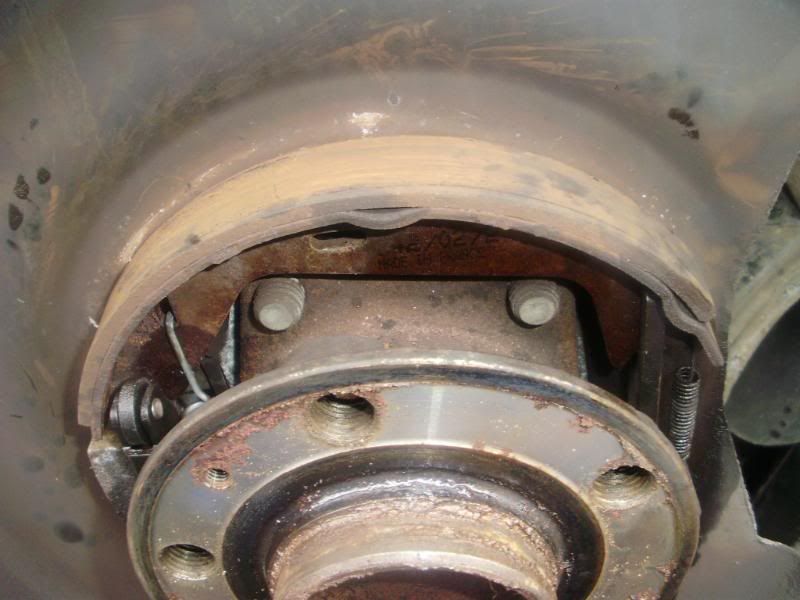 7) Remove springs from shoes,the spring in centre of hub was the trickiest I found,The trick to it is to use long nose plier to grab and push it into hub and while pushing to twist it just a touch,The spring then should come free,You can however encourage spring by pulling away top of shoe and by using a thin screwdriver to prise at spring end.The end result should look like this. 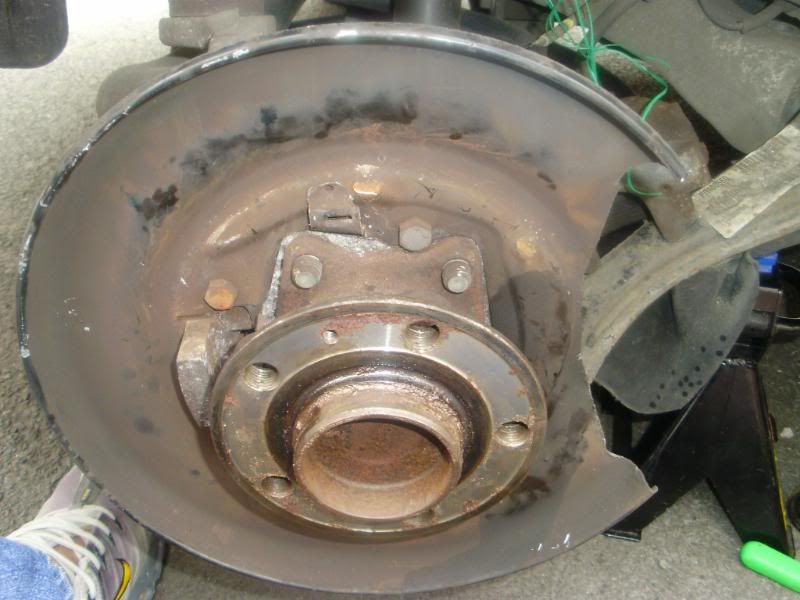 8) Clean the dust off hub and inspect hub area for grease leakage ,use light dabs of copper slip on area which comes into contact with brake shoes.Once all is clean fit new shoes and assemble new disc. Hint: fit side toward front of car first as the shoes once fitted squeeze together making it alot easier to fit disc. 9) Now for the pads,remove the pad at front of caliper which is bonded to caliper.Using a G clamp push back piston with old pad still in place.I used a Draper brake bleeding kit while pushing piston back,The caliper being a brake part which gets very hot should contain alot of crap which I didnt fancy pushing back into system. Once piston had been pushed back remove old pad which is clipped into place,Clean surrounding area of rust and dirt.Refit caliper and carriers and being to install new pads,If you are using original Volvo pads you will find the outer pad has a 3M sitcky pad on outside which bonds pad to caliper.Refit rattle springs,At this point you want to refer to picture you may have taken earlier to see how spring fits,Believe me I done it twice today  . .The end result should be like this: 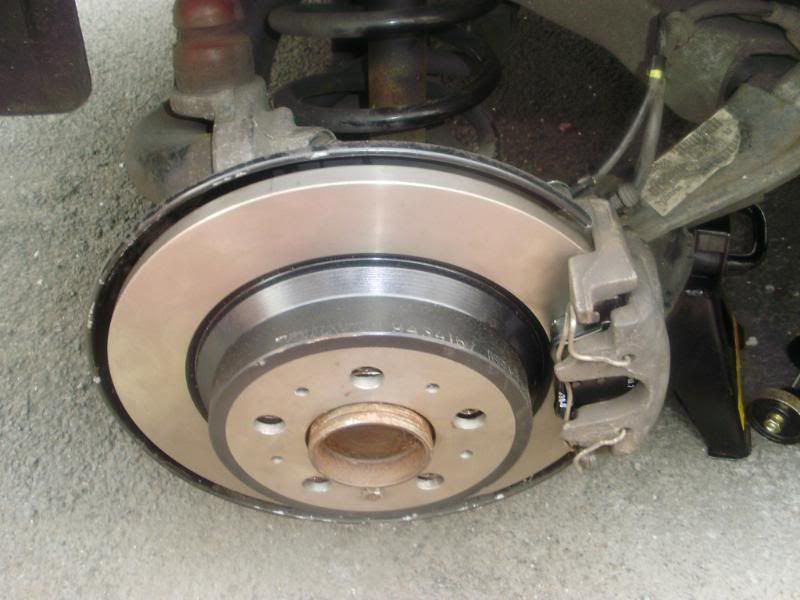 Repeat all steps for other side of car.Once all parts are fitted road test car,before moving of pump the brake pedal in order to push the pads into correct place.Drive at about 20mph and pull up handbrake,this will help embed the shoes,You may notice your handbrake may have got very tight after new shoes as was in my case,This means handbrake adjustment is needed. To Adjust Handbrake 1) Remove handbrake lever Gaitor,This normally just unclips upwards with console lid open. 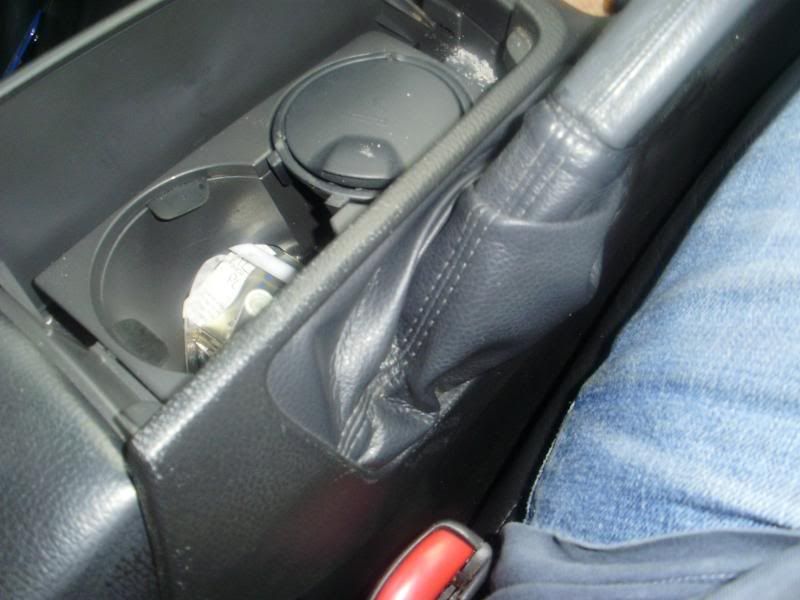 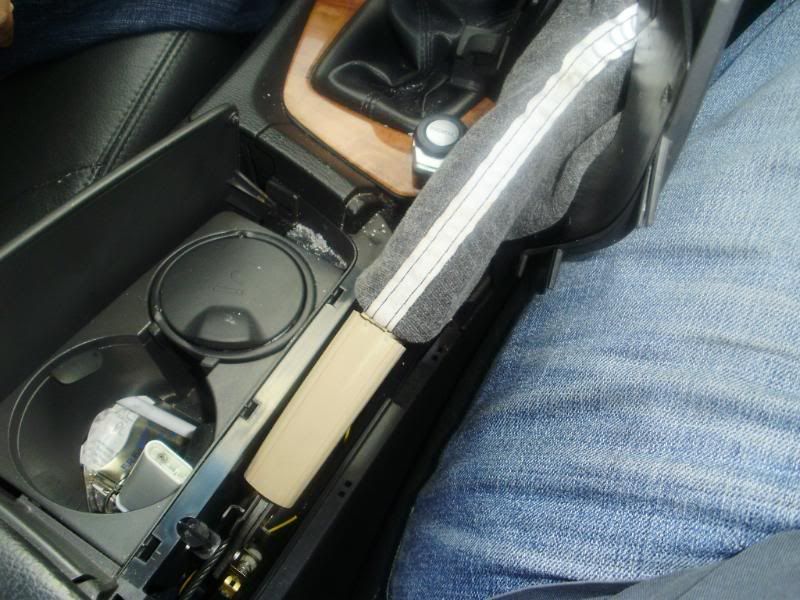 2) raise the biege coloured plastic flap and you will see a 10mm nut and bolt as in centre of pic below. 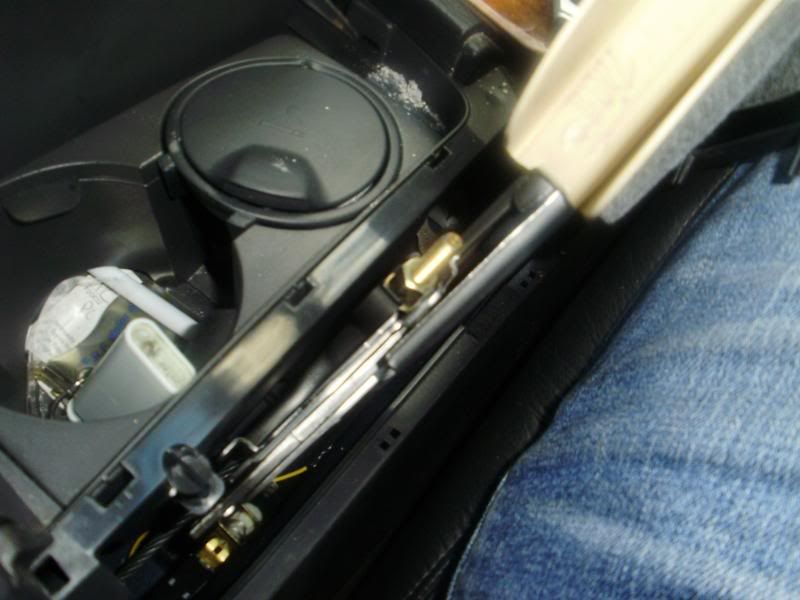 If you handbrake is too tight then turn nut anti clockwise,if loose then clockwise. Hope this helps Regards Mo Ps I really need to lose weight ,being a little large is making working on cars painful now 
__________________

Last edited by S60-MBS; May 2nd, 2009 at 23:42. |

|

|
| The Following 48 Users Say Thank You to S60-MBS For This Useful Post: | Aardvark S60, ant.f, azibux1, BeastFromEast, bic1, BlueRubber, blunders, buffalo4, cam, cbr1100, Chesterman, chrisg147, crowcrow, Dancake, davew, dzidek, fluff110, Gen_Billy, Georgey dee, GMcL, GorgeousGeorge, homersimspson, indie, JIM C, JNR Construction, johnnyv70, John_C, jonnyjohnson, manx1952, Nick0, Nick44, old onions, peterjbrown, petes60, plc143, Polo on, RaVolvoR, reesky, Rossi-fan, Rubic cube, s60, S60-D, scally, ShadeTek, surrey_man, toolbah, wadey, y2blade |
|
May 3rd, 2009, 20:20
|
#2 |
|
Senior Member
Last Online: Jun 8th, 2022 22:38
Join Date: Oct 2008
Location: Here
|
Thanks s60-mbs, that looks like a really useful guide. I'll give it a try - I've got a bit ore confidence at this stuff after recently changing my front discs and pads!
|
|
|
|
| The Following User Says Thank You to reesky For This Useful Post: |
|
May 3rd, 2009, 20:38
|
#3 |
|
VOC Member
Last Online: Jun 7th, 2020 11:28
Join Date: Jan 2006
Location: ????????????????
|
Hi Risky,
Give it a go its easy,Just remember to take your time.The spring in the centre holding the shoe is abit of a pain in the bum otherwise everything else is a doddle.
__________________
|
|
|
|
| The Following User Says Thank You to S60-MBS For This Useful Post: |
|
May 4th, 2009, 10:09
|
#5 | |
|
VOC Member
Last Online: Jun 7th, 2020 11:28
Join Date: Jan 2006
Location: ????????????????
|
Quote:
That is is the question I am asking myself and I am very annoyed with Stratstones who reported my brakes are worn by 80%,When I compared the old shoes to new shoes there was very little difference to be honest very hard to tell if there was any difference,Even the pads looked fine to me.Never the less its been an experiance for me as I have never done shoes before. Regards Mo
__________________
|
|
|
|
|
|
May 4th, 2009, 15:48
|
#6 | |
|
Premier Member
Last Online: May 5th, 2024 11:53
Join Date: Nov 2003
Location: Brecon
|
Quote:
__________________
1997 850 Tdi Auto Estate 416,000 miles scrapped May 2016 2003 V70 SE D5 Auto 350,000 miles dead in the drive way 2005 V70 SE D5 Geartronic 170,000 miles 05 2005 V70 SE D5 Geartronic 205,000 miles 55 2011 V70 Lux D3 Geartronic 220,000 miles |
|
|
|
|
| The Following 2 Users Say Thank You to DieselDoNicely For This Useful Post: |
|
May 5th, 2009, 16:20
|
#8 |
|
0's and 1's

Last Online: Jun 2nd, 2024 15:31
Join Date: Nov 2006
Location: -
|
Mo,
Looks like you were a little busy. One question though, since doing the work does you car still move slightly on the handbrake on an incline ? Reason I ask is because my car did it from when I bought it at two years old and like many on here accepted it as normal behaviour. Since having the discs, pads, handbrake shoes and backing plates replaced there is no movement on the handbrake, it now behaves and feels like the normal handbrake in any other car. Would be interested in how yours behaves now you've pretty much done the same as listed above. Cheers,
__________________
2011 Volvo S60 D3 R-design Premium - 2020 Focus ST estate automatic - 2020 KIA eSoul 150kW 64kwh EV Previous: 2005 Volvo S60 D5 Sport - 2017 Focus RS |
|
|
|
|
May 5th, 2009, 16:53
|
#9 | |
|
VOC Member
Last Online: Jun 7th, 2020 11:28
Join Date: Jan 2006
Location: ????????????????
|
Quote:
I didnt even think about that until now that you mentioned the movement,It actually doesn't/didn't move when I fitted the new bits.Now that I adjusted handbrake to match previous handbrake lever movement its started again.I may be taking the driver side bits off re fitting them as I can hear a slight squeal from the wheel.May just tighten up the handbrake again Regards Mo
__________________
|
|
|
|
|
|
Dec 10th, 2009, 14:10
|
#10 | |
|
Master Member
Last Online: Jan 31st, 2023 09:51
Join Date: Nov 2003
Location: Languedoc Roussillion
|
Quote:
Tried heating it, freezing it,copious amounts of WD40, solid as a rock. I don't want to start thumping it too hard, been using a club hammer and a block of wood. I've tapped around the edge and on the rear face of the disc, might as well be welded on for all the difference it seems to have made. Am going to replace the discs so not bothered if the are mangled. Reluctant to start really thumping it in case I damage the wheel bearing. In the picture following section 9 showing the new disc in situ what is the purpose of the nut head that appears at the bottom of the disc. Had enough today , out with the angle grinder tomorrow! Last edited by bogart; Dec 10th, 2009 at 15:41. |
|
|
|
|
|
| Currently Active Users Viewing This Thread: 1 (0 members and 1 guests) | |
|
|


 Linear Mode

