
|
|||||||
| PV, 120 (Amazon), 1800 General Forum for the Volvo PV, 120 and 1800 cars |
 Information
|
|
B20 buildViews : 13706 Replies : 147Users Viewing This Thread : |
 |
|
|
Thread Tools | Display Modes |
|
|
#111 |
|
Master Member
Last Online: May 8th, 2019 07:02
Join Date: Feb 2010
Location: Steyning
|
Without going out and looking, the cone nut from memory is between an inch and 2 from the end of the threaded rod. I will check properly later this morning. The clutch itself came in two packages.the driven plate was from Simon, the cover and release bearing were new old stock quinton hazel items which I had on the shelf. I remember measuring the height from the base of the cover to the top of the bearing to ensure that it was the same which it was.
|
|
|

|
|
|
#112 |
|
VOC Member
Last Online: Yesterday 18:24
Join Date: Jul 2006
Location: Chatham
|
Hmmmm.... the metal release bearing that I had fitted "in error" was a QH one.
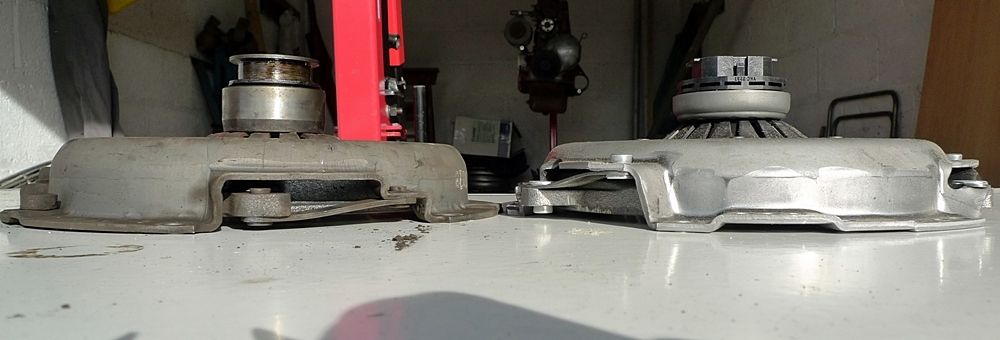
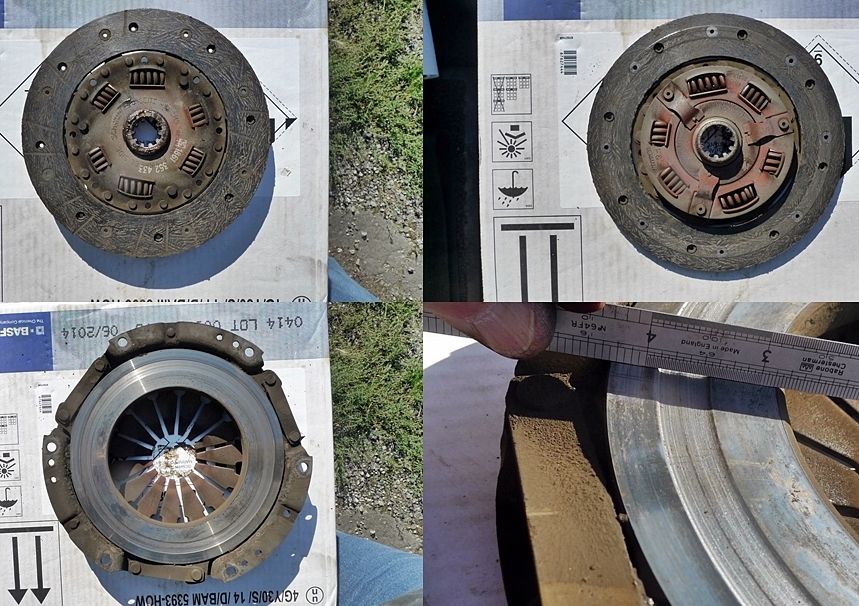
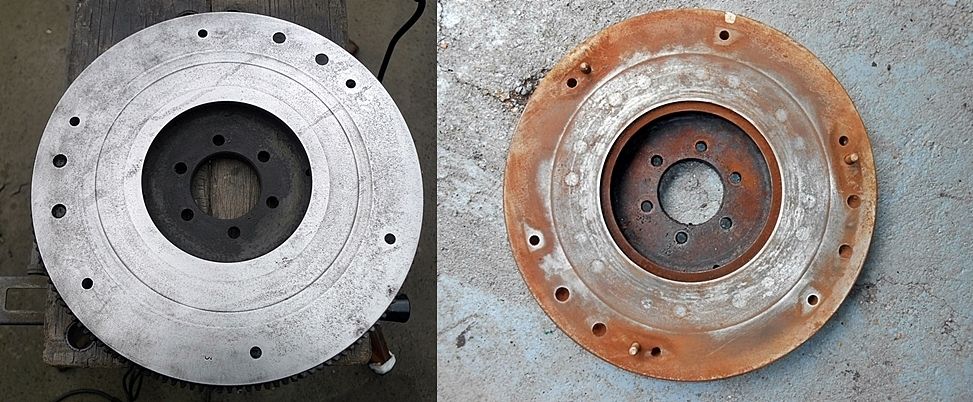
Late last night I composed a post and made up some pictures to show the difference between the release bearings. Also to tell the red face tale of how I got the garage to fit this QH bearing in place of the plastic one which came with the Brookhouse kit. It got me to Sywell but there was obviously a problem and there was also a whistling noise which turned out to be this bearing. Adjustment was right out on the end of the rod. Cap in hand I had the garage drop the box and replace it with the plastic one which added another £100 to the total bill. Not many miles since but I readjusted it again last week just before the MOT, which it passed with no problems at the same garage that did the clutch, twice. This post somehow didn't arrive to the forum but it was too late to do it all over again so I just put up a short version. I put these to pics up. the first showing the 2 types of clutch and bearing. The old low one, Borg&Beck, came out and had a tall bearing. The higher one on the right is a Brookhouse kit with a short bearing. As you can imagine these don't mix and match. The QH one that I had put in I thought was the same height as the plastic one but obviously not. It may be down to the shape/style of the diaphragm fingers which as you can see are different. I don't have a pic of the "wrong" bearing as that was still in the car when I took the pic of the pair of clutches. I will have to see if I can do pic of that one with a plastic one. The second composite pic shows the state of the old clutch. Easy to see why it was slipping!!   Julian. I can't really say that your QH cover and bearing are correct for each other but if it's a low cover and a short bearing there maybe an issue. There is another factor that is rarely mentioned. At some point Volvo changed the way the centre part of the flywheel is machined. I think it coincided with the change from spring to diaphragm clutch. If you use a diaphragm clutch with its matching drive plate on the old style the cast centre section can touch the flywheel before the friction material so a bit of noise but no drive. I hadn't heard of this until I read about it on Brickboard. I have two flywheels. The first came with an engine that was originally had an autobox and the other bought here from Swede as it was going begging. Destination for one of them is onto an engine that I'm sprucing up which came without one. A surprise for me was that the 2 I have are different and show the change to the centre recess. The slightly rusty one shows the extra bit machined out of the centre for drive plate clearance.  We'll get to the bottom of this but the solution may or may not be easy if you see what I mean. I'll PM you my number in case you want to chat....... |
|
|

|
|
|
#113 |
|
Master Member
Last Online: May 8th, 2019 07:02
Join Date: Feb 2010
Location: Steyning
|
Thank you Derek for all your trouble and thorough interrogation of this issue. Following our chat earlier, you are obviously the first to know that I seem to have come through this adventure.
I started by taking up a small amount more adjustment on the clutch thrust rod leaving an eighth of an inch play. I followed this up with a further bleed and eureka. Biting point is about 2- 3 inches from the bottom which suits me very well. Following this unexpected Breakthrough I got on and fitted my electric fan- fabricating brackets to avoid the fretting which can be caused by the through rad fixings. Last check of fluids and hose clips. Final check of timing. She started first time and sounded great. After 10 minutes some spitting and noise made me stop. A tappet had wound loose. Readjusted all clearances and all good. Subsequent 25 mile gentle drive and all seems to be good. Lining up for the rolling road. |
|
|

|
|
|
#114 |
|
Senior Member
Last Online: Apr 9th, 2024 10:10
Join Date: Jan 2014
Location: stranraer
|
Great you have got this sorted, it must be a great relief! Further to some of the issues raised in the process of trying to resolve this problem, many people seem to have problems bleeding the clutch. My car is currently off the road but I do need to move it out of the garage now and again, requiring the clutch to work. The slave cylinder leaks and if not topped up the master cylinder will gradually empty itself conflicting with your theory Derek (which I would have thought would be correct), on a couple of occasions I have left it too long and it has emptied completely making it necessary to bleed from scratch on my own with just a pipe with one way valve in a jar. This took 5 mins not requiring any special technique or raising the rear end of the car etc. This is not bigging myself up, just wondering why what is apparently the same system on two different cars can either be a real pain to bleed or very simple. A couple of further points, the slight leak from the slave cylinder is not making it easier somehow because it has never been difficult to bleed even when not leaking. And secondly I am using used brake fluid at the moment because I will be rebuilding both cylinders before putting the car back on the road. Despite all this the clutch works perfectly when done.
|
|
|

|
|
|
#115 |
|
Master Member
Last Online: May 8th, 2019 07:02
Join Date: Feb 2010
Location: Steyning
|
It's very odd and in 30 years, I've never experienced a problem like it.
Some time off and spring sunshine have enabled me to get on and tackle the usual shake down issues following a major mechanical rebuild. I did have a hair raising moment yesterday when the oil warning light came on. I turned off pretty well instantly. Turned out that the wire to the switch had got caught on the header, melting the insulation and shorting the lamp! I'm pretty happy with how the car is running and next Friday I'll be off to the rolling road. I'll report back on the quality of work there and on dyno figures. |
|
|

|
|
|
#116 |
|
Amazoniste
|
Glad you got the clutch issue sorted. Am I reading it correctly that the solution was to bleed the system when the clutch arm was adjusted as tight as possible?
That's lucky! Btw, not tempted to fit a proper pressure gauge? My experience of the repro oil pressure senders is that they last about three years...
__________________
Paul - 1967 Amazon 222S B20 o/d Estate & 1961 A-H Sprite Mk2 948cc WANTED - For '67 Amazon estate - offside rear quarter, preferably new old stock. |
|
|

|
|
|
#117 |
|
Master Member
Last Online: Aug 29th, 2016 19:28
Join Date: Oct 2013
Location: Seattle
|
Julian, I'm so glad to hear that your B20 is in place and running! Did you notice any improvements in power and smoothness?
P.S. Can you load a photo of the engine in place? |
|
|

|
|
|
#118 |
|
Master Member
Last Online: May 8th, 2019 07:02
Join Date: Feb 2010
Location: Steyning
|
I have already noticed a big difference in power though I am being fairly gentle at the moment. Did some more carb balancing yesterday but I'm leaving it for the rolling road now to finish the job. Went for a drive last night and a hill I would have laboured over in third we cruised up effortlessly in fourth.nill post a pic later.
|
|
|

|
| The Following User Says Thank You to Amazonjulian For This Useful Post: |
|
|
#119 |
|
Master Member
Last Online: May 8th, 2019 07:02
Join Date: Feb 2010
Location: Steyning
|
As promised a couple of pictures... One of the nervous moments before start up and the other of the engine in situ
|
|
|

|
|
|
#120 |
|
Master Member
Last Online: May 8th, 2019 07:02
Join Date: Feb 2010
Location: Steyning
|
And another
|
|
|

|
 |
| Currently Active Users Viewing This Thread: 1 (0 members and 1 guests) | |
|
|