
|
|||||||
| 850 / S70 & V70 '96-'99 / C70 '97-'05 General Forum for the 850 and P80-platform 70-series models |
 Information
|
|
Handbrake cable/ shoes/ springs replacement (Manual FWD 855)Views : 5060 Replies : 4Users Viewing This Thread : |
 |
|
|
Thread Tools | Display Modes |
 Nov 15th, 2012, 20:07
|
#1 |
|
Rover Turbo Nutter

|
NOTE TO MODS:
Please do not remove this, it's a work in progress. It's posted while I'm part way though for the most part because before now I have lost ENTIRE guides I have spent hours writing and editing before posting them, and I'm starting to get a little paranoid about that happening again. I will be completing it once I have finished the job and taken the photos I forgot to take while I was taking parts OFF.  Summary This guide will show you how to replace the handbrake cables on a manual FWD Volvo 855. The instructions contained within this guide also show how to remove the center console, how to adjust the position of the handbrake shoes, how to replace handbrake shoes and how to replace the springs and retainers/guides for the handbrake shoes. Tools used
Notes on good practice N.b: Not all of the above tools are essential, I have simply listed everything that I used. Worth thinking that if I have used it, it was useful for something - else I wouldn't have bothered removing it from the tool box. N.b: It's not essential, but I would recommend that all sockets used were six sided sockets - always helps prevent rounding the heads on old rusty bolts. N.b: It's not essential, but I would recommend that all sockets used were 1/2" drive - less stress on the ratchet and more leverage because of the longer ratchet handle always helps. N.b: It's not essential, but I have made it my MO to wire-brush and copper grease every bolt I ever remove from a car before putting it back in, on the grounds that if the car is still going in ten years' time, somebody might well be very glad I did - possibly even myself. N.b: It's not essential, but I also always make a point of placing bolts I have removed back in their threads while I work, as it helps a great deal with keeping track of them and prevents losing any! Procedure Remove the center console. If your car is automatic, you do not need to remove the gear lever knob to remove the center console. However if it is manual, you will need to remove both the gear knob and lever gaiter. I found a useful thread explaining how to do this when I was trying to myself; albeit that I did not need to use the befuddling idea of battering the hell out of the clips inside the gaiter with a piece of metal tubing... << Gear knob and lever gaiter removal link >> Then remove the center console.
Until I have taken my own photographs tomorrow I shall link this thread to another I have come across which helped with my taking the center console out. << Center console removal link >> N.b: CAUTION! Before doing anything further, make sure the car is in reverse, to prevent it rolling and falling off the axle stands. Once you have done this, make sure the handbrake is off. Slacken the handbrake travel/balancer bolt.
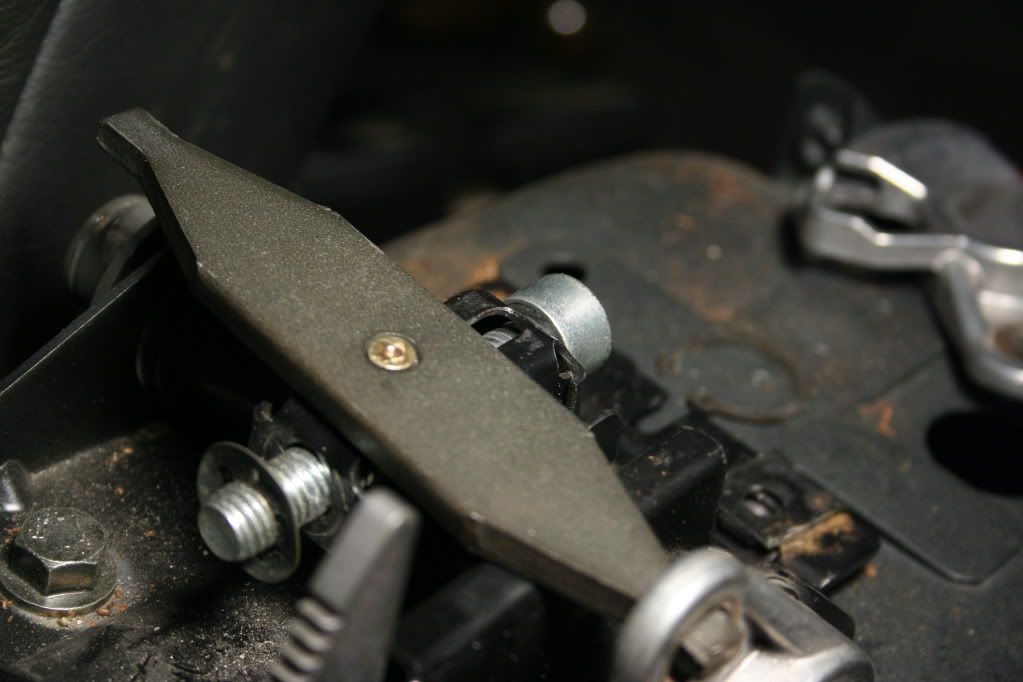 Remove the circlip holding the quadrant onto the bar and slide it off the bar.
 Once you have the quadrant removed, unhook the end of the handbrake cable from it. [IMG][/IMG] With the wheels still on the ground, slacken the wheelnuts.
Then jack the car up using the jacking point. [IMG]left[/IMG] [IMG]right[/IMG] and support it with an axle stand.
Remove the wheelnuts and then the wheel. N.b: If the wheel has not been removed for some time, it may be reluctant to separate from the hub. Give the top of the wheel a firm kick to separate it if this is the case. [IMG]wheel off[/IMG] Undo the caliper bolts.
 Remove the caliper from the disc.
 Before removing the disc you will need to wind the shoes all the way in to ensure that they do not catch on the disc as you pull it off.
<< How To Adjust 850 Handbrake >> Remove the spiggot pin.
 With the disc off, you will see the shoes and mechanism. Top view;  View from underneath;  Unclip the top spring, and push the shoes apart at the top, then take out the shoe adjuster bar.
Unclip the lower spring.
N.b: CAUTION! This is quite a strong spring, it will require a good deal of effort to unclip, and when it does unclip you are unlikely to keep it hooked on the end of the screwdriver - it is more likely to ping off at speed. Keep your fingers clear if you don't want them at best numbed, and at worst bloodied. [IMG][/IMG] Remove the shoes and springs, making sure to put the shoes somewhere they aren't likely to get accidentally sprayed with penetrating fluid or nudged with a copper grease covered knuckle if you are reusing them rather than replacing them. I am replacing the springs and shoe retainer/guides on my 850, as while removing the O/S disc, the pads caught on a lip that had built up inside the disc, and it caused one of the retainer/guides to snap. This is what happens if you don't take care of brake discs with shoes inside the bell.   Remove the retainer/guides (you can see in the second picture where mine has snapped).
  Once the bolts are undone the retainer/guides simply unhook.  Pull the lower arm thingy out of the hub towards the back of the car, bringing with it the cable itself so you can get at it to remove the arm from the end of it. [IMG][/IMG] Remove the lower arm thingy from the end of the cable.
Draw the handbrake cable out from inside the car. N.b: It will probably snag a couple of times as it comes under the carpet. If it does, don't just keep pulling, push it back in a little bit and try twisting or nudging it side to side to free it.   Undo the mounting bracket from the bottom of the arch.
I found the best way to free off the head of the bolt was to simply put one of the 8mm ring spanners on the nut, and turn it, allowing the whole bolt to rotate - that action breaks up the dried mud and it drops away as dust, allowing you to then get the other 8mm ring spanner onto the head of the bolt and undo it.  Remove the handbrake cable from the front of the hub. N.b: This will be pretty tight in there, as it is a ridged plug that is pushed into the hub - two hands and pull like you mean it.  Reassembly Putting the new handbrake cables in is best done in the reverse order to the manner in which you removed them - I found it was easier to push the new ridged plug into the hub if the rest of the handbrake cable was secured. Insert the new handbrake cable into the hole from which you removed the old one, and push it through under the carpet. It should appear out of the hole in the carpet around the center console/handbrake. N.b: Much like when pulling the cable out from the inside of the car, while pushing it back in under the carpet the cable may snag a few times. As before, don't just keep pushing, but twist or move the cable side to side to try and free it. N.b: It may take a couple of efforts to get it to appear there - when I began pushing the cable through I was concerned that it would simply wind up snaking it's way ALONG the exhaust tunnel and under the seats, but it only too me four or five minutes of pushing, pulling back a little, wiggling side to side and twisting to get them in the correct position, so don't be concerned if you don't get it spot on first time. When it appears in the hole in the carpet, you want to grab it and guide it into the collar on the side of the transmission tunnel.   Reconnect the mounting bracket.
Once that's done, slide the rubber bung along the sheathing and insert it into the hole in the floor. N.b: This is awkward as hell. I managed it by using the wide screwdriver on my swiss army knife to keep wedging more and more of it inside the hole. Just keep at it, you don't want water getting up under the carpets.  Push the ridged plug into the front of the hub. N.b: I found it easiest to locate the plug into the hub by pulling the cable through the sheathing, and putting that through the hole first. Relocate the lower arm thingy onto the end of the new cable. N.b: I would suggest NOT using the pliers for this, as you may damage the new cable. It is not as difficult to push a cable end into the lower arm thingy as it is to remove one. [IMG][/IMG] Push the cable back through, and relocate the lower arm thingy. [IMG][/IMG] Hook on and bolt up the new shoe retainer/guides.
[IMG][/IMG] Position the shoes in the retainer/guides, be they new or the old items being reused. Loop the end of the lower spring through one of the holes, then stretch it and loop it through the other. N.b: This, it turns out is a valid use for that kooky hook thing you find on the back of most swiss army knives - something I've never previously found a particularly good use for. Obviously I'm not saying 'go buy a SAK in order to be able to do this job' but if you have one, get it out and use that little hook with pride, because I suspect none of us will ever really find another good use for it. N.b: Once you've just about got it looped through the hole, it's likely the end of the spring itself will get caught halfway through the hole. I used the deep 10mm socket on the 1/4" drive spinner handle, put it against the loop at the end of the spring, and gave it a tap with the rubber mallet. [IMG][/IMG] Pull open the top of the shoes, and put the shoe adjuster bar back in, then reconnect the top spring.
[IMG][/IMG] I]Author: Chris Vardon. Photographs: Chris Vardon.[/I]
__________________
Vard. 1996 Volvo 855 R Last edited by Vard66; Nov 15th, 2012 at 23:02. |

|

|
|
Nov 15th, 2012, 23:12
|
#2 |
|
Rover Turbo Nutter
|
Huuuuh?
180 minute post edit limit? What madness is this?
__________________
Vard. 1996 Volvo 855 R |
|
|
|
|
Nov 16th, 2012, 10:03
|
#3 |
|
Master Member
Last Online: Dec 19th, 2020 16:24
Join Date: Apr 2009
Location: Bodmin
|
Can I suggest you tie a length of string as a mouse to the old cable before you pull it out and then use it to pull the new cable back through. Might save a lot of wriggling and frustration.
Good write-up.
__________________
huron 2009 V70 2.4 geartronic in red. |
|
|
|
|
Nov 16th, 2012, 21:21
|
#4 |
|
Rover Turbo Nutter
|
An excellent suggestion, that never crossed my mind.
I'll make sure to put it into the final edit of the OP.
__________________
Vard. 1996 Volvo 855 R |
|
|
|
|
Apr 21st, 2013, 19:41
|
#5 |
|
Senior Member

Last Online: Dec 5th, 2013 17:48
Join Date: Dec 2009
Location: carlin how, saltburn by the sea
|
Wish I'd found this earlier
 A great help all the same and a good explaination with great pix to match 
__________________
1997 850 T5 S |
|
|
|
|
| Currently Active Users Viewing This Thread: 1 (0 members and 1 guests) | |
|
|


 Linear Mode

