
|
|||||||
| 850 / S70 & V70 '96-'99 / C70 '97-'05 General Forum for the 850 and P80-platform 70-series models |
 Information
|
|
New pride & joyViews : 76455 Replies : 301Users Viewing This Thread : |
 |
|
|
Thread Tools | Display Modes |
 Feb 7th, 2011, 21:33
|
#61 |
|
Premier Member
Last Online: Yesterday 22:21
Join Date: Jan 2011
Location: Horne (Nr. Horley)
|
OK, more tinkering this evening:
Next jobs on the list were to replace the cambelt, along with the idler wheel, tensioner and water pump - the full monty. As the water pump has to come out, I'd left the "coolant change" part of the main service until now. First off was to drop the coolant, it was surprisingly clean, but didn't look to have too much antifreeze in it, so we'll remedy that. Next, the coolant reservoir was really mucky with lots of oily brown sludge: 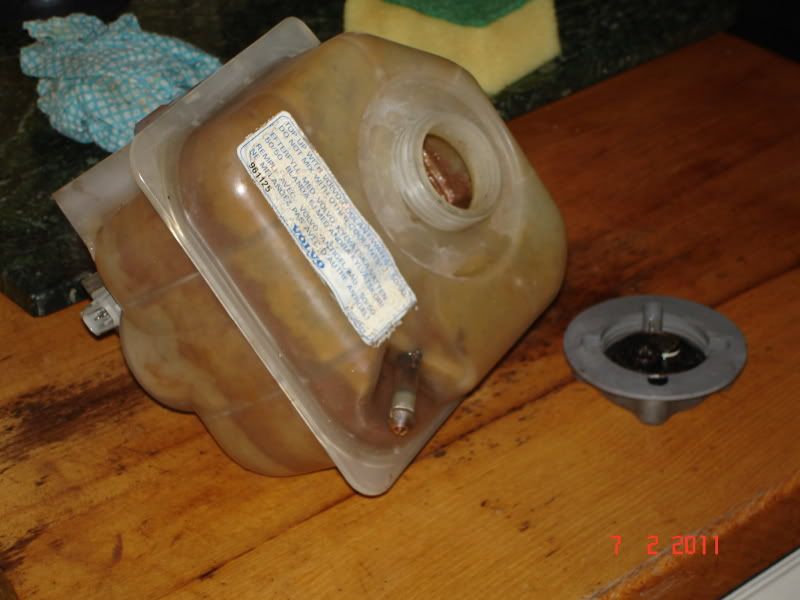 I tried wasing this out in the sink, but the brown stuff was very oily - I reckon it's had a H/G failure or an oil cooler failure in the past - the rad looks to be recent, so my money's on a cooler failure, and they never bothered to clean the rest of the system. Anyway, I flushed it out with a couple of rinses of petrol, then oven cleaner, bleach etc. and this is as good as I can get it: 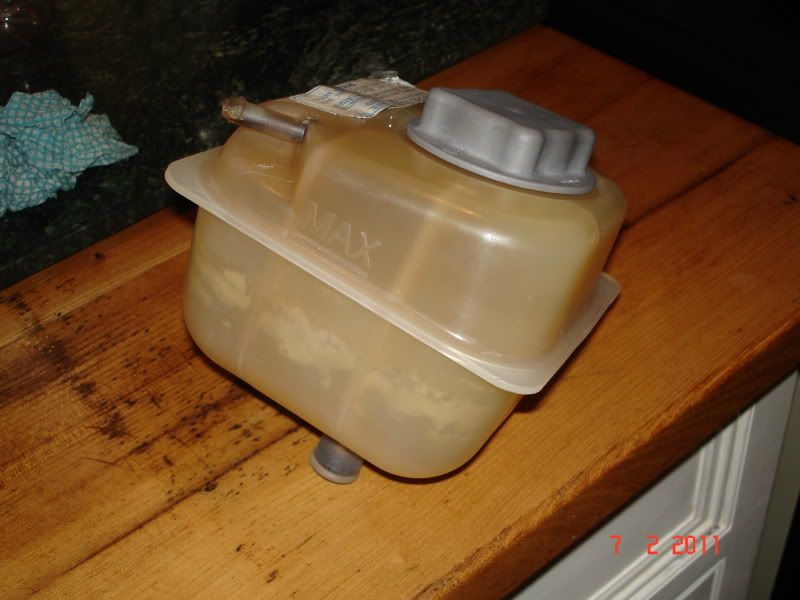 Next up, the cambelt change! First job was to print off Jod's excellent guide, http://www.volvoforums.org.uk/showpo...43&postcount=1 and basically follow that step by step. I'll say now that the guide is spot-on, down to pretty much every detail, so a big thanks for that - much better than Haynes! First job is to remove the auxilliary belt and tensioner. You need to release the tension on the belt, and this is where you really need a special tool - but it's easy to make, took me 10 minutes as I already had an "L" shaped piece of mild steel box section. Here it is doing its job: 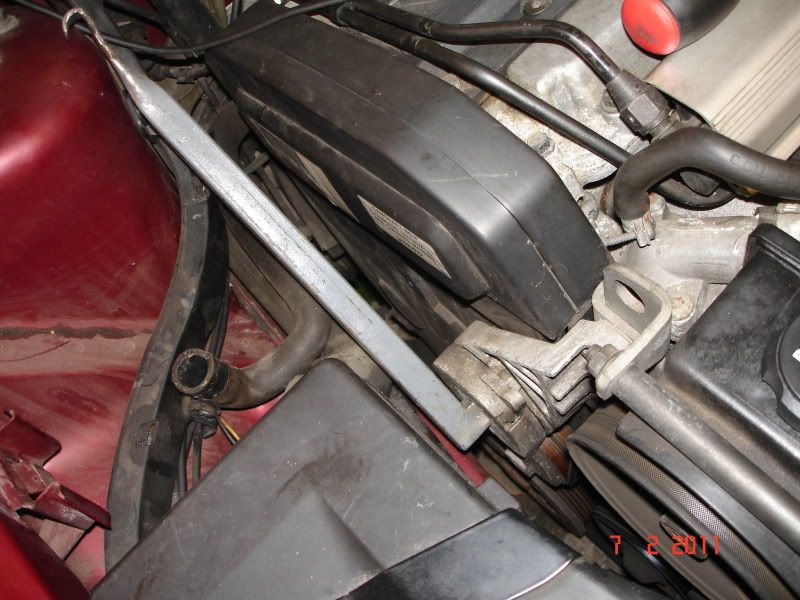 The belt just lifts off, two 12mm bolts for the tensioner and that lifts out - easy. Then off with the outer cam cover, here it is removed: 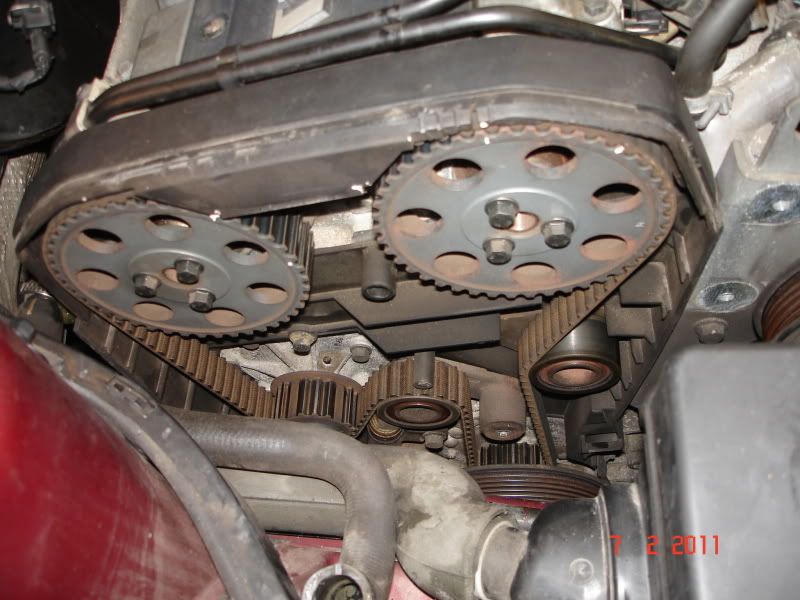 Then I just followed the steps in the guide and stripped it all down. The timing marks were easy to see, but I added my own in white paint as a belt-and-braces measure. It'd clearly had a belt before, as you could see the previous person's marks. The only problem was that the main tensioner torx bolt was pretty tight, and I could only just get my wrench and bit in there, but it eventually capitulated and came out, although not without giving me a dose of the skinned knuckles, and in this case a skinned arm too: 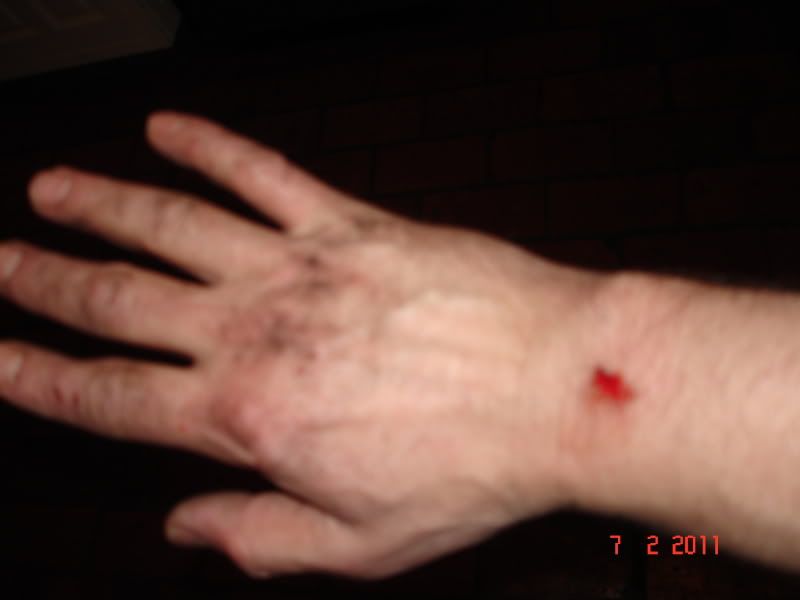 The water pump has 7 x 10mm bolts which are a little awkward to get to, so were time-consuming to take out, and I wasn't prepared for the huge amount of coolant that came out when I released the pump! Still, I have a number of old towels in the workshop, so these came to the rescue. Then off with the belt - this is a real mare to thread out from behind the bottom pulley, in the end I cut it off to save time, but it's going to be fun getting the new one in there..... Here it is with all the "stuff" removed: 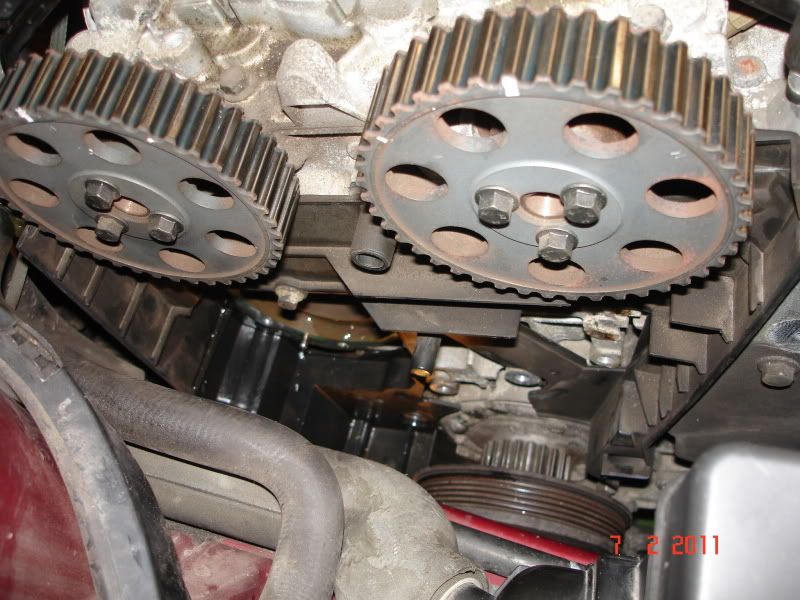  Here are the old bits that will be replaced: 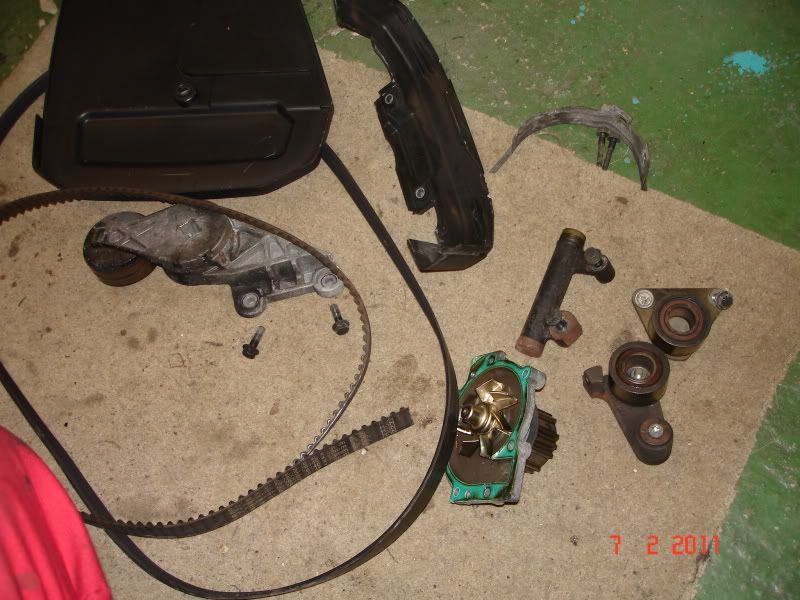 And here are the new bits ready to go in: 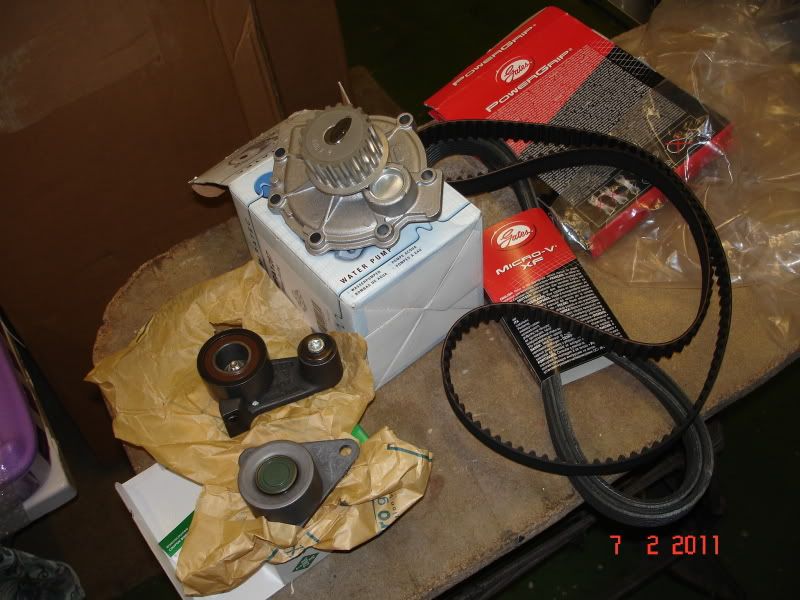 That's all I had time for this evening, next job will be to put it all back again! The only tricky job I foresee will be getting that belt around the bottom pulley - there's a tiny vertical gap that's only about as wide as the belt is thick, so it's going to be a patience-tester I think. I'll let you know how the re-assembly goes. Cheers for now!
__________________
Some people are like Slinkies, they serve no useful purpose but they still bring a smile to your face when you push them downstairs. Last edited by Luxobarge; Feb 7th, 2011 at 21:37. |

|

|
| The Following 7 Users Say Thank You to Luxobarge For This Useful Post: |
|
Feb 7th, 2011, 21:44
|
#62 |
|
Owner Volvovehiclesclub

Last Online: Apr 4th, 2014 12:18
Join Date: Dec 2008
Location: Choosing which Volvo to go out in Today !!! lex parsimoniae
|
I would think about changin yer Res Cap as well.... them Grey ones are RUBBISH at sealing after a while .. Go & treat it/yourself to a nice new fangled green one .. loads better at sealing & you wont lose yer water either !!!
__________________
 2000 C70 T5 Phase 1 240 Bhp in Saffron Orange ("SAPPHIRE") 2001 S80 2435cc Now with Andy Northface () 1994 960 CD 3.0 Estate ("The Purple Monster") VOC 25900 lex parsimoniae |
|
|
|
|
Feb 8th, 2011, 19:04
|
#63 |
|
Premier Member
Last Online: Yesterday 22:21
Join Date: Jan 2011
Location: Horne (Nr. Horley)
|
OK, more tinkering this evening.
First job was to put the new water pump in. It was very difficult to clean off all the previous sealant, although there was only a very thin bit on there, so I used a thin smear of Loctite 598 on the gasket and located the gasket on the two dowels. Then fiddled the water pump in the hole and located it on the dowels, and back in with the 7 x 10mm bolts - new ones are supplied with the pump. All went in OK, actually easier than taking it out, as the bolts all wind in most of the way by hand. Then re-fit the belt - I was dreading this, given how difficult it was to get the old one out from behind the crank pulley, but in fact it went back in really easily, only took a couple of minutes. Here is my nice new shiny water pump fitted and new belt threaded around crank pulley: 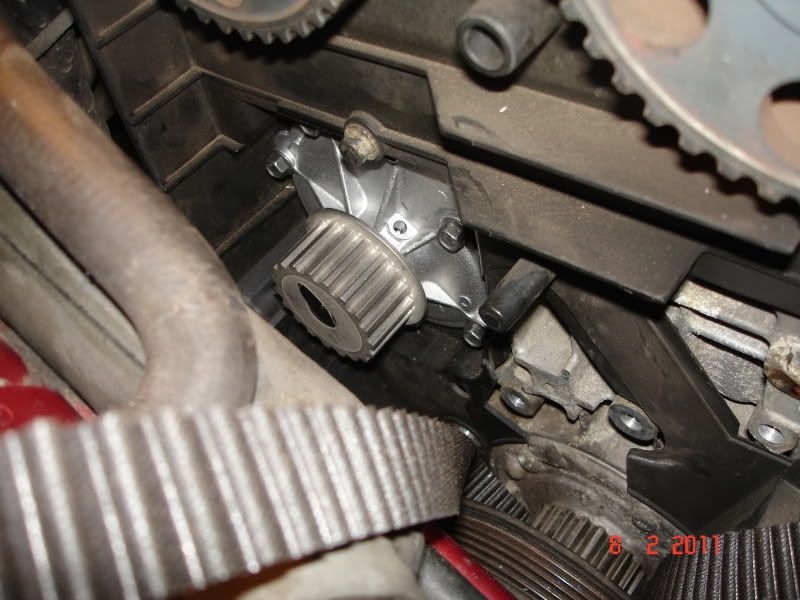 Then clean up the other components, put the hydraulic tensioner in a vice to compress it (you need quite a large vice to take the length) and put a pin in it to hold the tension until the belt is on. Fit all the components in reverse order: Hydraulic tensioner, tensioner pulley, idle pulley and fit the belt. Here it is fitted up: 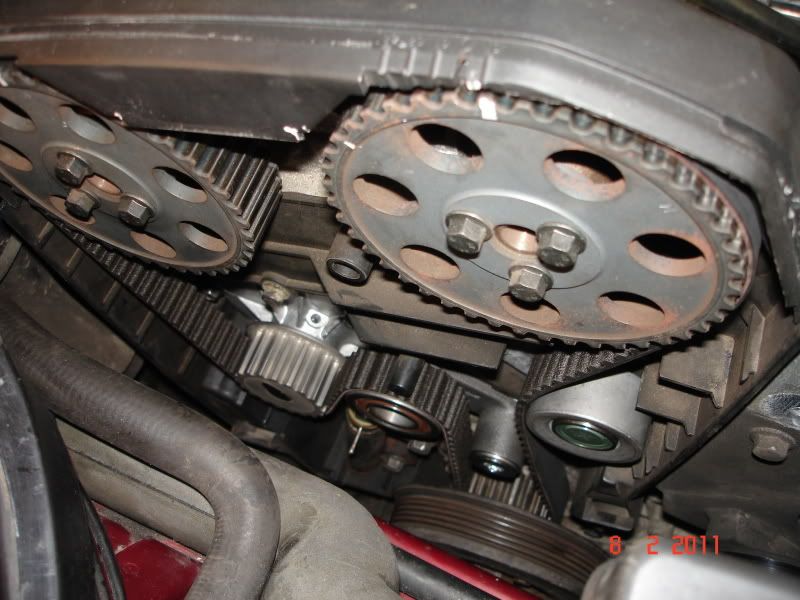 Wound the engine over a few times with a socket (30mm) on the crank pulley and checked the timing marks - the cams and crank hadn't moved at all while I worked on it, so all was good. Then used a large pair of pliers to remove the pin in the hydraulic tensioner, gave it a few moments to tension up and rotated the engine a few more times - again, all the marks checked out so that's good. I started the engine briefly at this point, and it ran fine, so back on with the little tin shield around the crank pulley (not too difficult) and back on with the covers etc. and then I fitted the auxiliary belt tensioner. Then I went to fit the new auxiliary belt, but it seems they've given me the wrong one - the new one is about 2 inches longer, and has grooves on both sides, so I'll have to take that back in the morning - shame, Camberley Auto Factors were doing so well up to now - all correct parts apart from this! Anyway, I fitted the coolant reservoir temporarily and re-filled with nice new red long-life coolant, job (nearly) done! It's nice to be able to see the coolant level in my newly cleaned reservoir! Here it is all ready apart from missing an aux belt:  I celebrated by putting a new washer on the oil filler cap - hopefully keep the top-end leaks down a bit. So, sort out the belt in the morning, then that's another couple of jobs ticked off. Next I think it's time to clean the throttle body and swap the lower suspension arms - not looking forward to that, I hope the ball joint clamp comes undone OK!  More anon.
__________________
Some people are like Slinkies, they serve no useful purpose but they still bring a smile to your face when you push them downstairs. |
|
|
|
| The Following 8 Users Say Thank You to Luxobarge For This Useful Post: |
|
Feb 8th, 2011, 20:37
|
#64 |
|
VOC Member 23660

|
I know yours is a different engine to a 960,but when i recently did my 960 i thought the serpentine (fan)belt that was supplied was to long.It turned out that the belt had been rerouted round the ancilary eqiupment (a Volvo mod) and needed to be longer.I dont know weather thats relevent to you'r engine, its worth checking out the faqs though, Luxobarge.
__________________
 Old Works Motor. Old Works Motor.Malcolm and my Wheels, 1998 V70 2.5 20 Valve Auto Classic,Unmodified. |
|
|
|
| The Following User Says Thank You to Toplights For This Useful Post: |
|
Feb 8th, 2011, 20:45
|
#65 |
|
VOC Member 23660
|
Have a look hear Luxobarge,great write up by the way.
http://www.volvoforums.org.uk/showth...erpentine+belt
__________________
Old Works Motor.Malcolm and my Wheels, 1998 V70 2.5 20 Valve Auto Classic,Unmodified. |
|
|
|
|
Feb 8th, 2011, 20:51
|
#66 |
|
Master Member

Last Online: Apr 20th, 2021 00:04
Join Date: Mar 2010
Location: merseyside
|
well done luxobarge, nice write up and well done...
john
__________________
_current car 2003 s40 2.0 green ________________ 1998 v70 10v turquoise(231,000 and rising) 1997 S70 green |
|
|
|
| The Following User Says Thank You to johnnyv70 For This Useful Post: |
|
Feb 8th, 2011, 21:07
|
#67 | |
|
Premier Member
Last Online: Yesterday 22:21
Join Date: Jan 2011
Location: Horne (Nr. Horley)
|
Quote:
Thanks for taking the time to post that link though! Anybody got a diagram of the correct routing? Cheers
__________________
Some people are like Slinkies, they serve no useful purpose but they still bring a smile to your face when you push them downstairs. |
|
|
|
|
|
Feb 8th, 2011, 21:22
|
#68 |
|
Ovlovnut

|
For what it's worth, I got my serpentine belt from Rufe, so Volvo OE. Only grooved on one side IIRC. Two sizes are available. longer one for cars with air con. shorter without. Now if yours has not ogt A/C that could be the issue. If yours has, then the belt must be wrong?
This pic may assist? Think I've got it right... http://www.google.co.uk/imgres?imgur...w=1672&bih=777
__________________
2004 V70 2.4SE Auto 'The Welshmobile 2002 Laika Ecovip 400i ( Motorhome on an Iveco 2.8TD) http://www.gitessouthbrittany.com/ http://moncopainmonchien.jimdo.com/ |
|
|
|
|
Feb 8th, 2011, 21:32
|
#69 | |
|
Premier Member
Last Online: Yesterday 22:21
Join Date: Jan 2011
Location: Horne (Nr. Horley)
|
Quote:
__________________
Some people are like Slinkies, they serve no useful purpose but they still bring a smile to your face when you push them downstairs. |
|
|
|
|
|
Feb 8th, 2011, 21:39
|
#70 |
|
Mad Murdoch

|
Hi LB is yours the ME7 engine or not just that I thought you had to remove the bottom pulley to change the belt I may be wrong not done mine yet
__________________
"If It Ain't Broke Don't Try To Fix It" Jim Day  1999 V70 2.5 T SE Auto "ME7" Caravan = 2003 Swift Charisma 550 4 Berth |
|
|
|
|
| Currently Active Users Viewing This Thread: 1 (0 members and 1 guests) | |
|
|


 Linear Mode

