
|
|||||||
| 850 / S70 & V70 '96-'99 / C70 '97-'05 General Forum for the 850 and P80-platform 70-series models |
 Information
|
|
rebuild, light at the end of the tunnelViews : 12643 Replies : 85Users Viewing This Thread : |
 |
|
|
Thread Tools | Display Modes |
 Sep 8th, 2011, 13:38
|
#11 |
|
Trader

Last Online: Jul 26th, 2023 19:59
Join Date: Dec 2004
Location: chesterfield
|
Some fantastic work there, she really did have a lot of dents!
I look forward to some finished pics. Custom splitter..... something you might be interested in reproducing? Andy
__________________
Andy Bird - Roll Up & Shine - Premium Car Care & Detailing Products - Polisher Hire www.rollupandshine.com Enter VOC5 at the checkout for 5% discount on everything. |

|

|
|
Sep 10th, 2011, 08:34
|
#12 |
|
Senior Member

Last Online: May 16th, 2022 12:04
Join Date: Dec 2004
Location: Wangavegas
|
OMG....that looks so gorgeous. I love that colour.
All the work and effort that has gone into the car is clear to see in the fantastic results that you have achieved. Seeing your pic's makes me a tad jealous, as I have a car covered in parking and rugby ball dents, swirls, scratches and the clear coat lifting on the bonnet. I want to get my car looking pristine again, and so, not knowing much about car painting and preparation, I was wondering if you could answer a few questions that I have? Once you had identified all the dents on the body, did you panel beat them out with a hammer and dolly and then apply filler, or just fill and sand back? Is the epoxy a binding agent and filler/primer? What exactly is the pearl twist, the tinted clear coat and the pearl tvr laquer? What is a mat? Sorry for all the questions, but I find all of this a tad confusing and slightly mind boggling. Anyway, keep up the great work and I will be very keen to see the next batch of pic's of your progress. |
|
|
|
|
Sep 10th, 2011, 11:00
|
#13 |
|
Premier Member
Last Online: Jul 4th, 2022 16:48
Join Date: Feb 2007
Location: belfast
|
great work that is such a nice colour when fresh,,,,,

__________________
1995 black 854 t5r man, |
|
|
|
| The Following User Says Thank You to martybelfastt5 For This Useful Post: |
|
Sep 10th, 2011, 16:51
|
#14 | |
|
Member

Last Online: Oct 2nd, 2019 01:52
Join Date: Feb 2011
Location: essex
|
Quote:
epoxy is a non build etch primer. ie has not enough body in it to do the final shaping with. my job at work is classic car restoration so on a old e-type or similar, there will be huge propensity for the car to rust. epoxy is applied as a "wet on wet" primer in that you lay a coat on the area you want rustproofed (typically areas that get stonechipped) and before it dries totally you go over the top with your high build two pack sanding primer volvo 421 dark olive is a two stage pearl. when you put down the base coat, it has a pearl tinter in it naturally. for a different look, my car has a pearl base as normal, a fine laquer mist sprayed over the top from a tvr tamora (twinkly laquer if you like) then the gloss final clear coat can be tinted. i added mercedes 197 obsidian black into my laquer at 4:1 so the laquer has a smokey navy tint rather that being just clear. makes a subtle twist on a already nice colour. it will stand out in a crowd at shows etc. mats is just short for materials lol as in - paint and mats - paint and materials regards gav |
|
|
|
|
| The Following User Says Thank You to gavT5 For This Useful Post: |
|
Sep 10th, 2011, 17:18
|
#15 |
|
Member
Last Online: Oct 2nd, 2019 01:52
Join Date: Feb 2011
Location: essex
|
these were the custom lights i have made for my car. the headlight glass and indicators looked "too white" for my taste but i dont like any of the aftermarket parts i have seen to date. the rear lights also werent to my taste so set about making my own. you start by using a water based degreaser and a trizact pad ( a 3000 grade polishing disc/pad) and lightly rub this over the surface to give a key up.
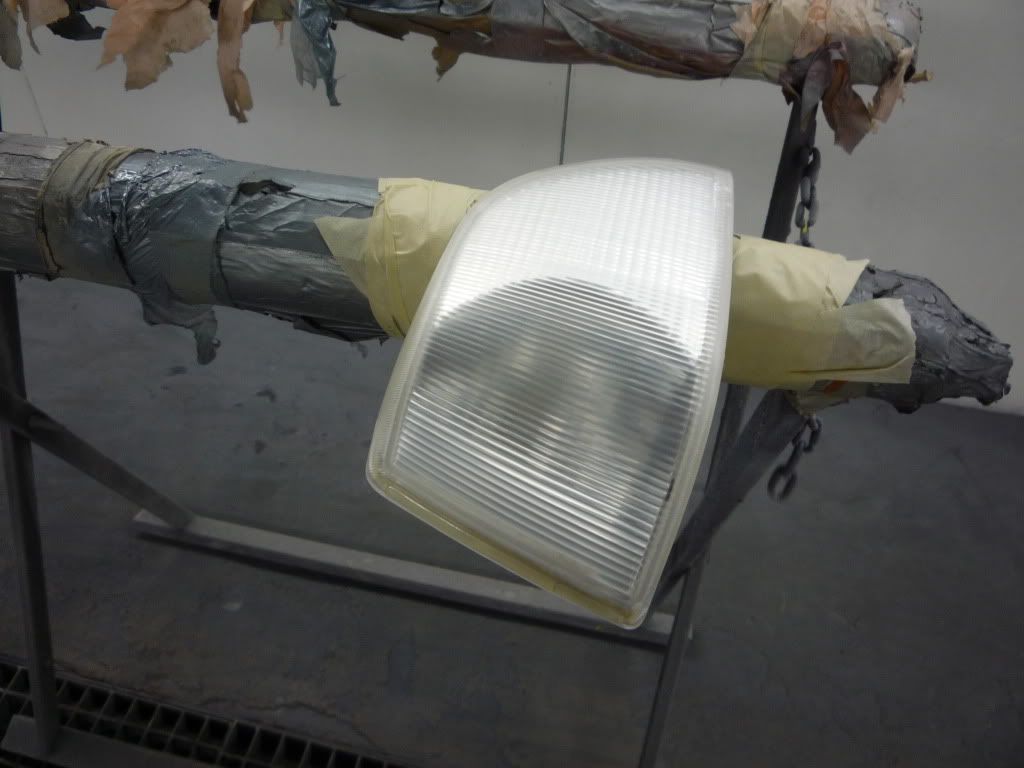 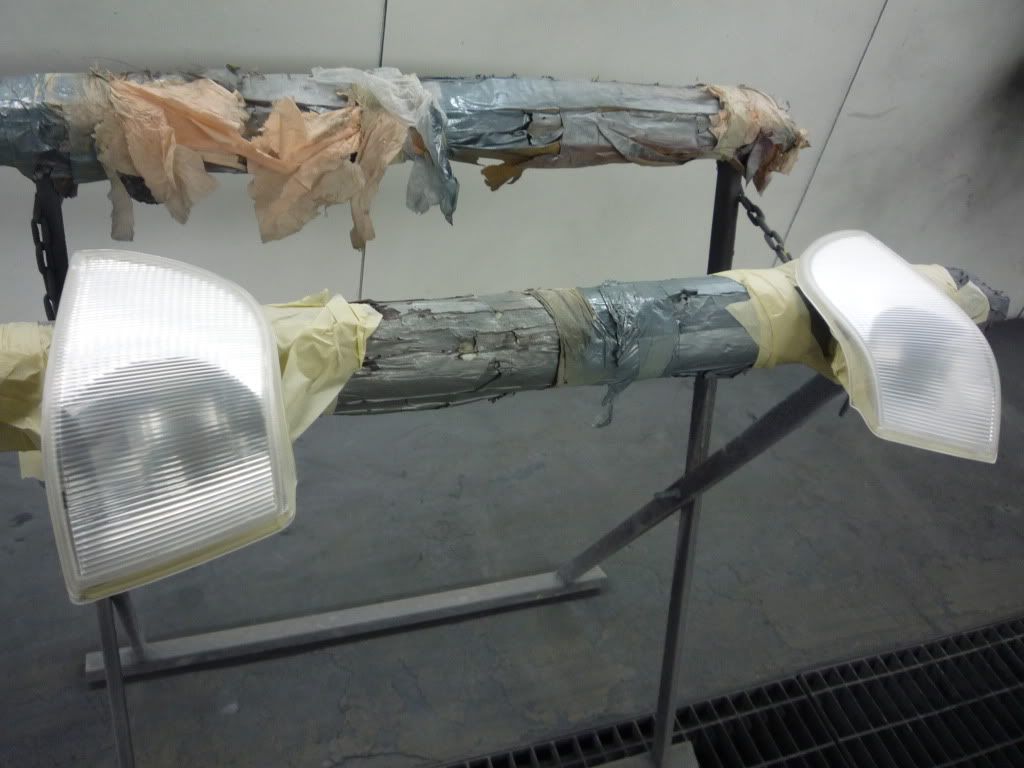 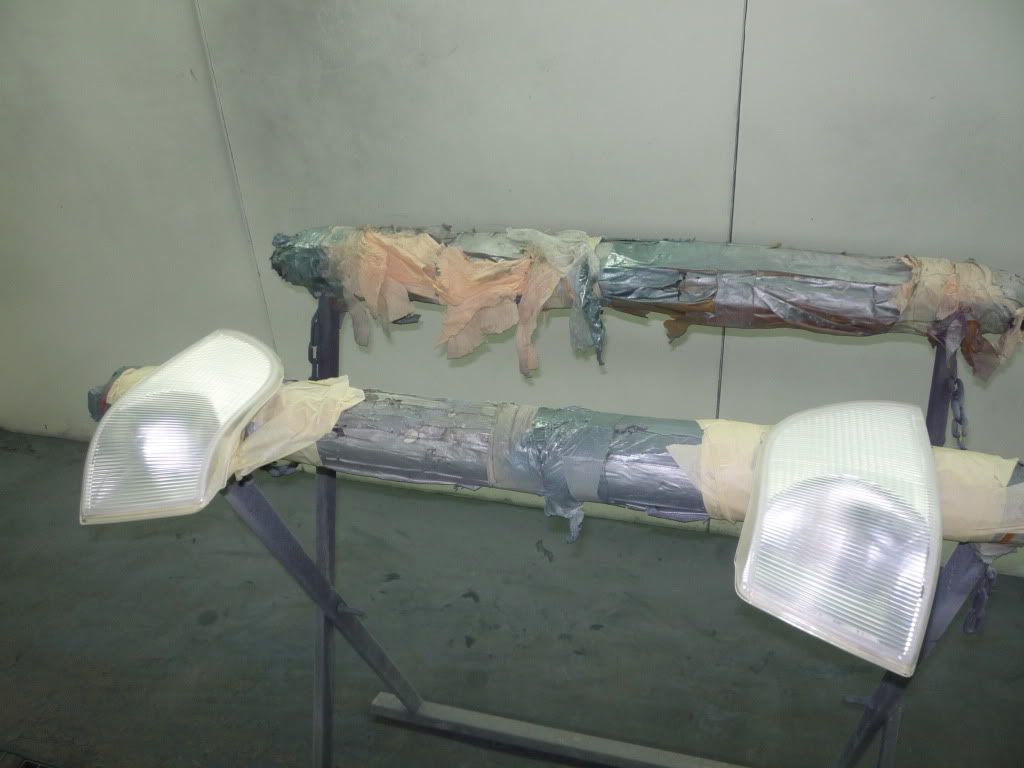  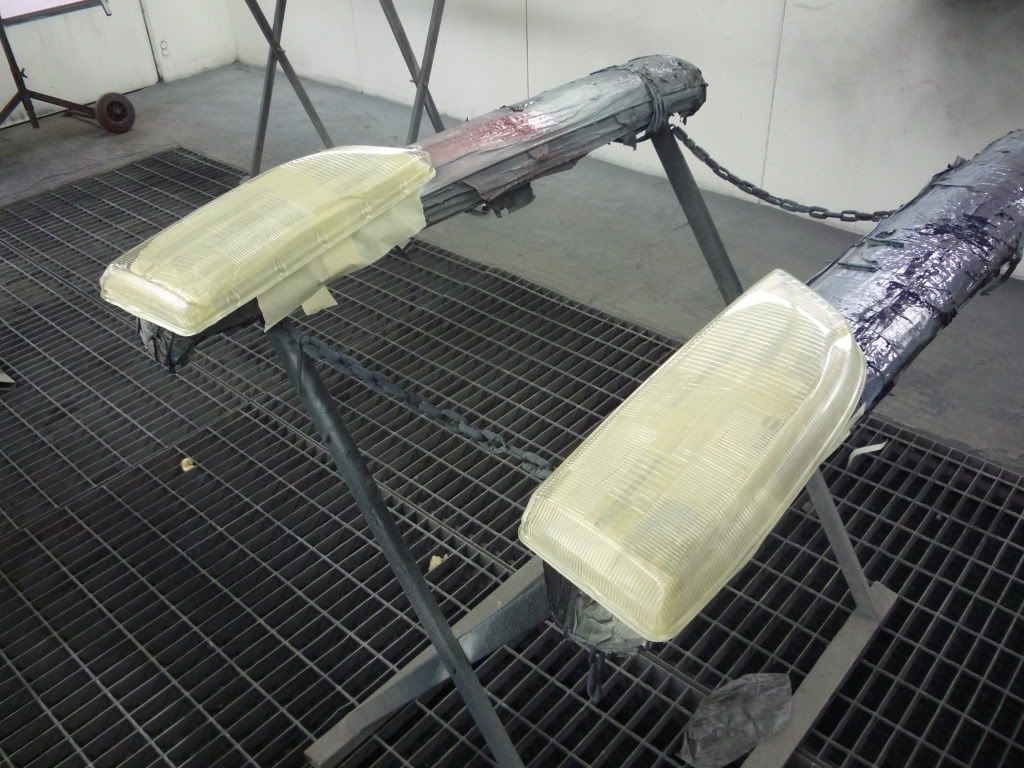 i also did this with the rears and then masked out the "clear" sections and papered over the rest of the lights. 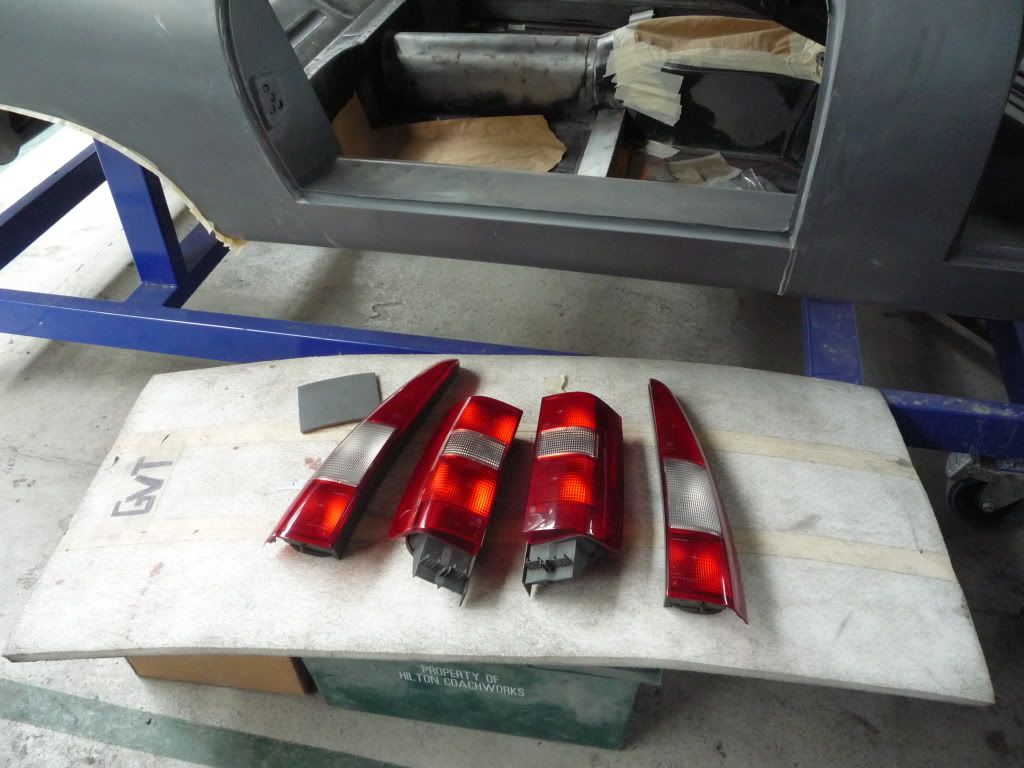 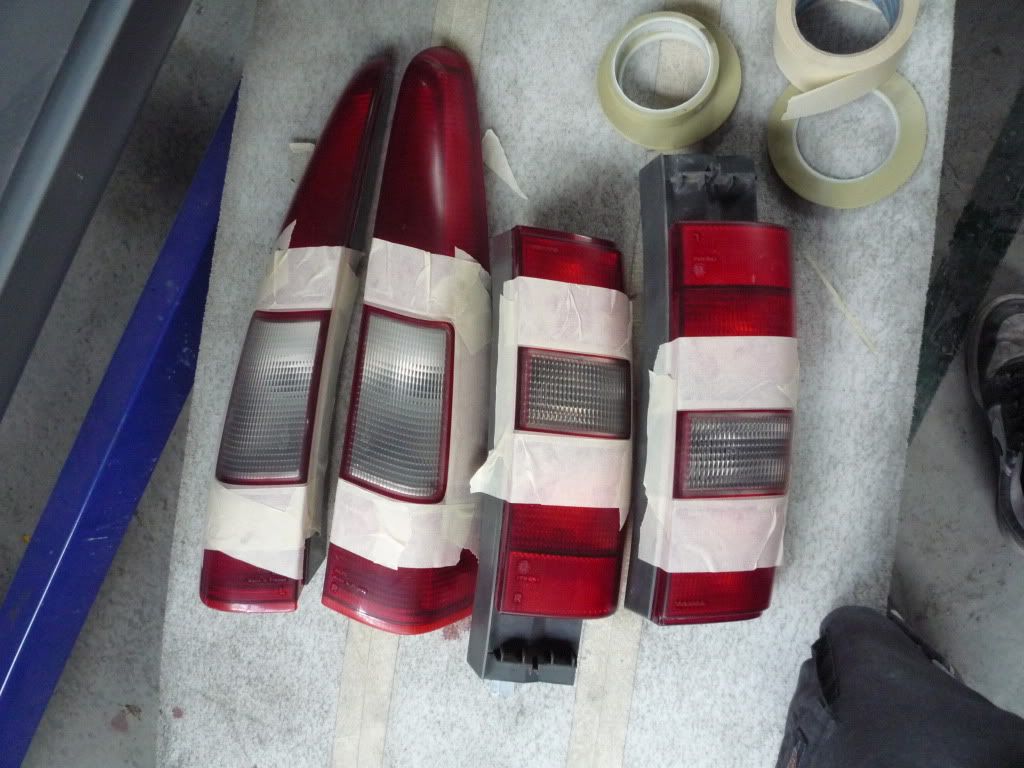 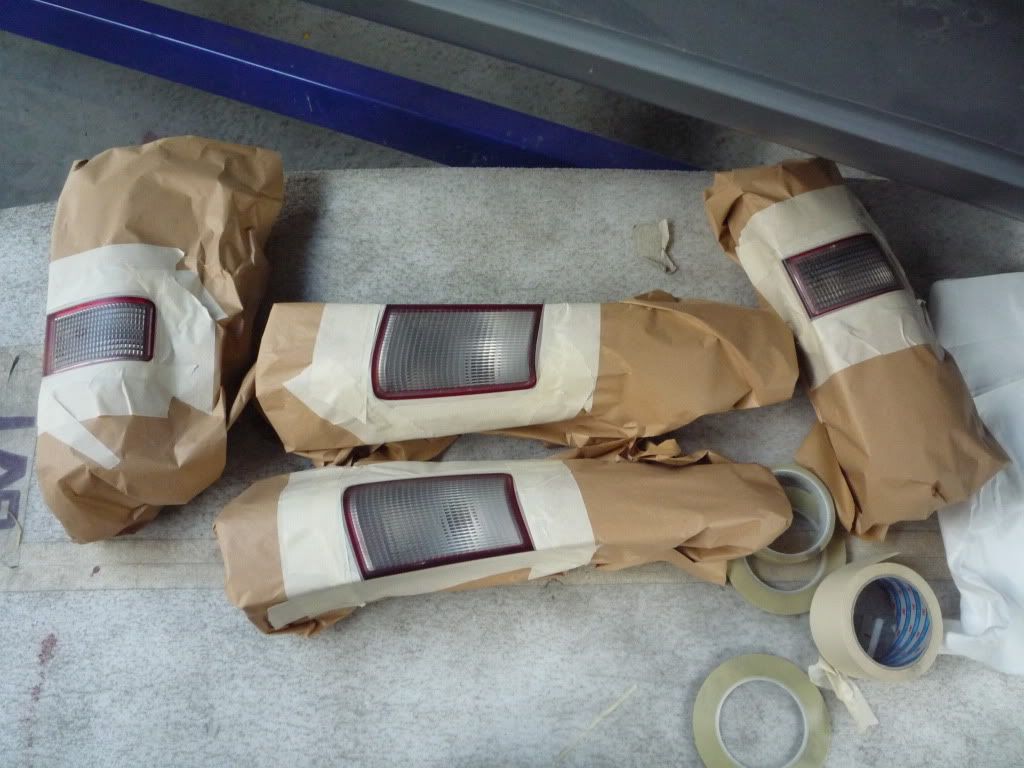 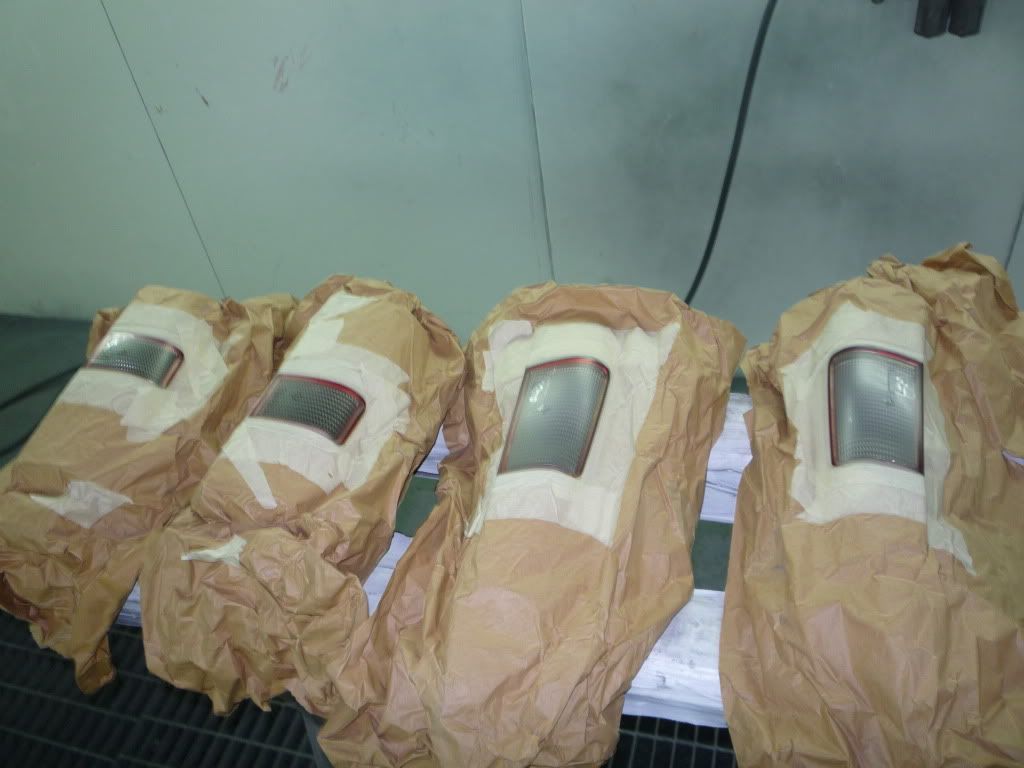 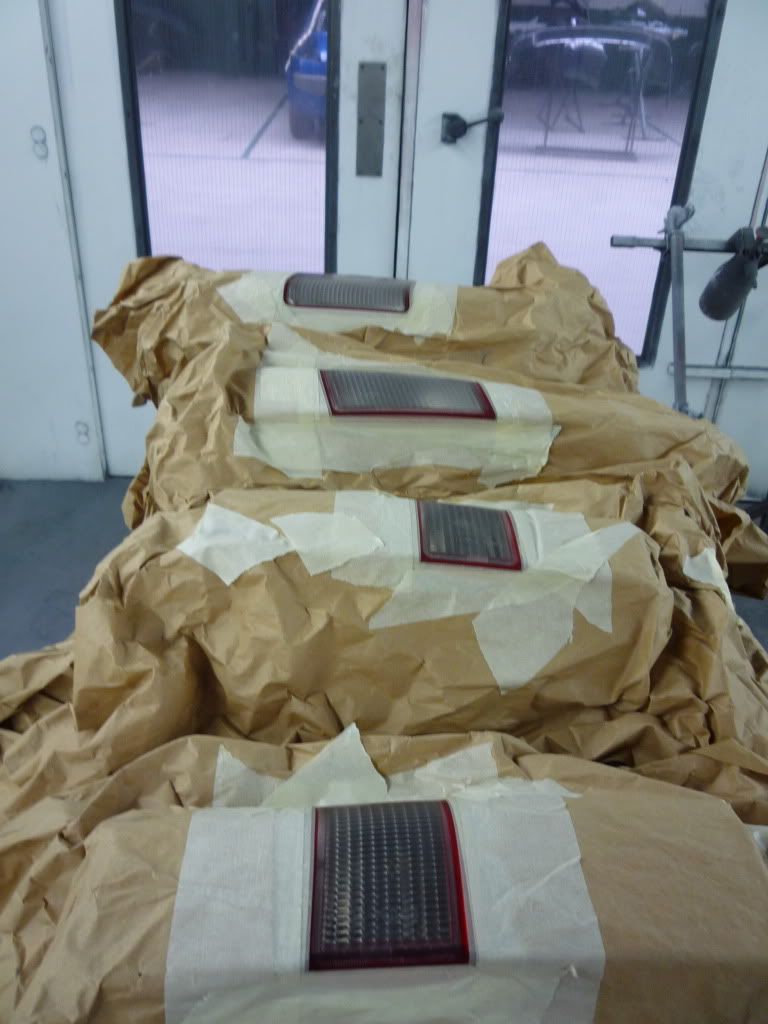 then you mix laquer with black base coat, i used bmw sapphire black 2008, at a rate of 50% before you add the hardener ( you can mix anything up to 50% to get the tint level you want. you can tint two pack laquer any colour you wish) lay two coats over the desired tinted areas 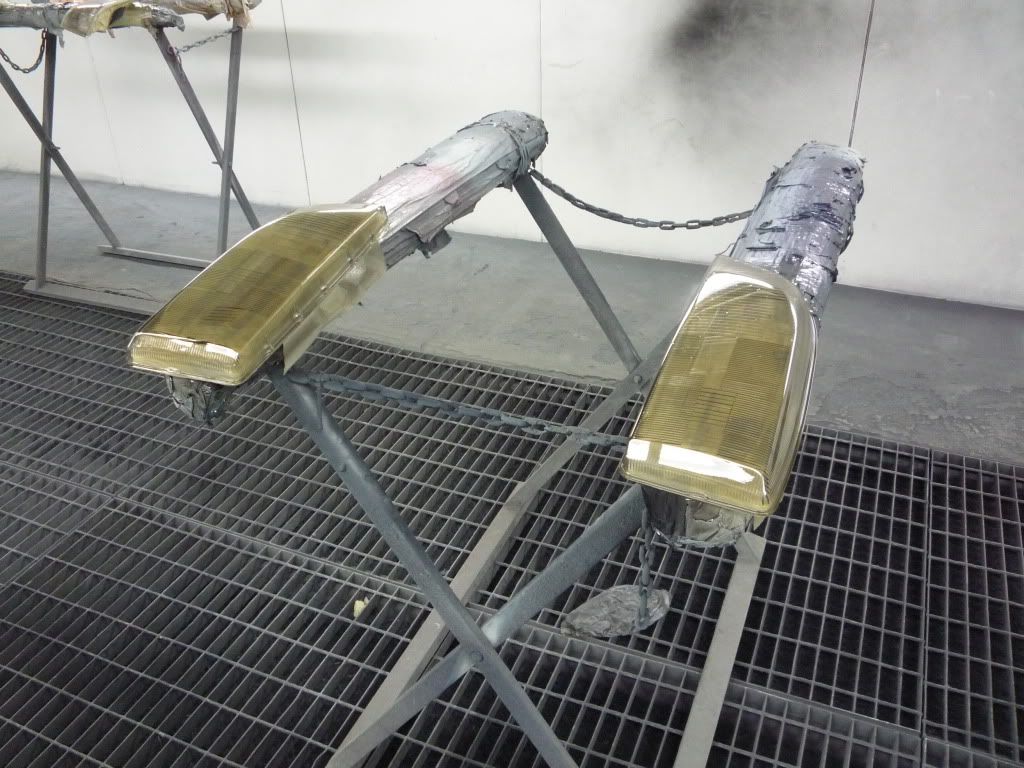 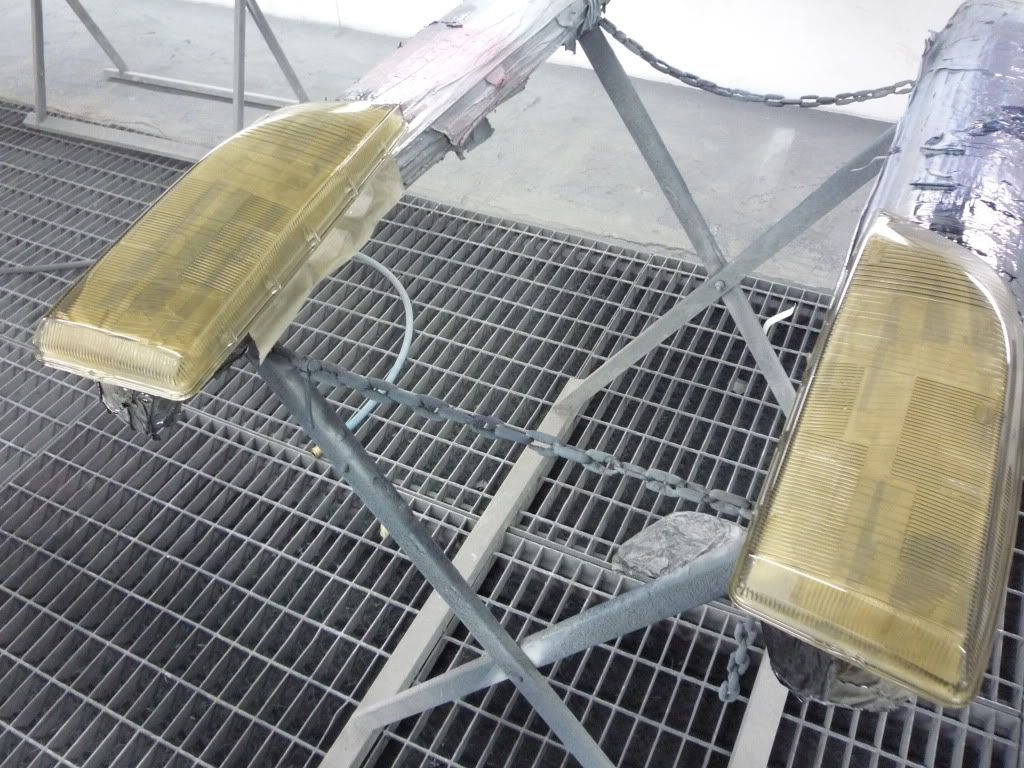  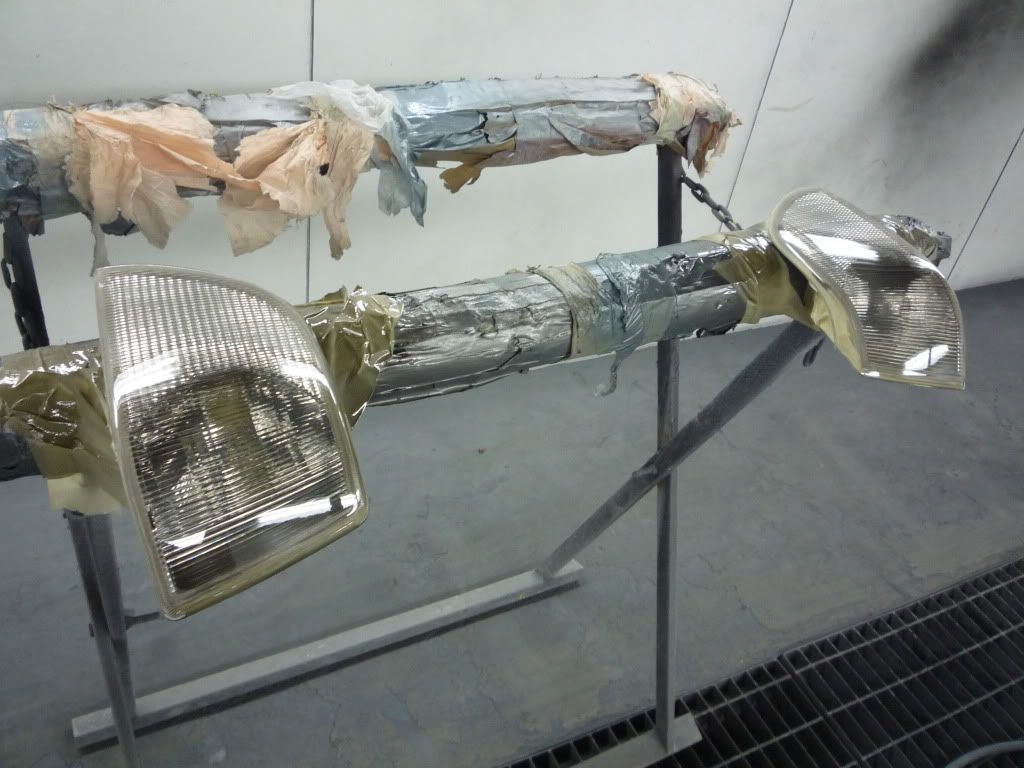 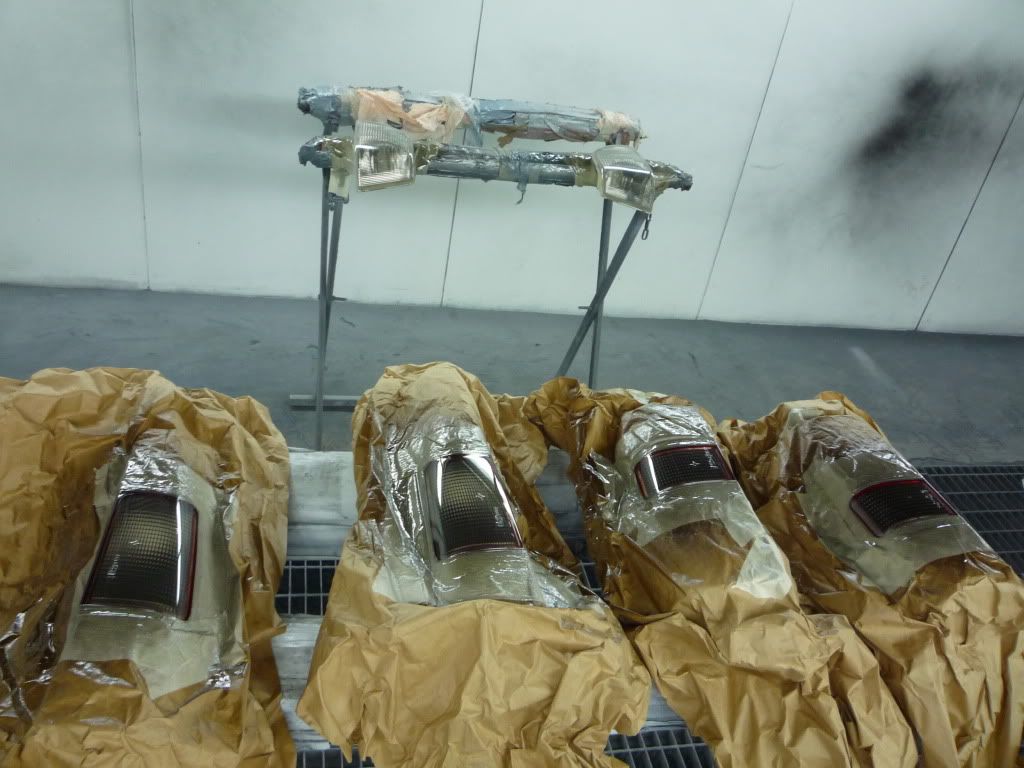 you then wait for that to flash off (partially dry but still soft) and spray over some clear laquer. in the case of rear lights care fully remove all surrounding masking from the lights but do not for christs sake touch the grey wet laquer. then as the unsprayed parts were already trizactd you spray over the top with clear coat. 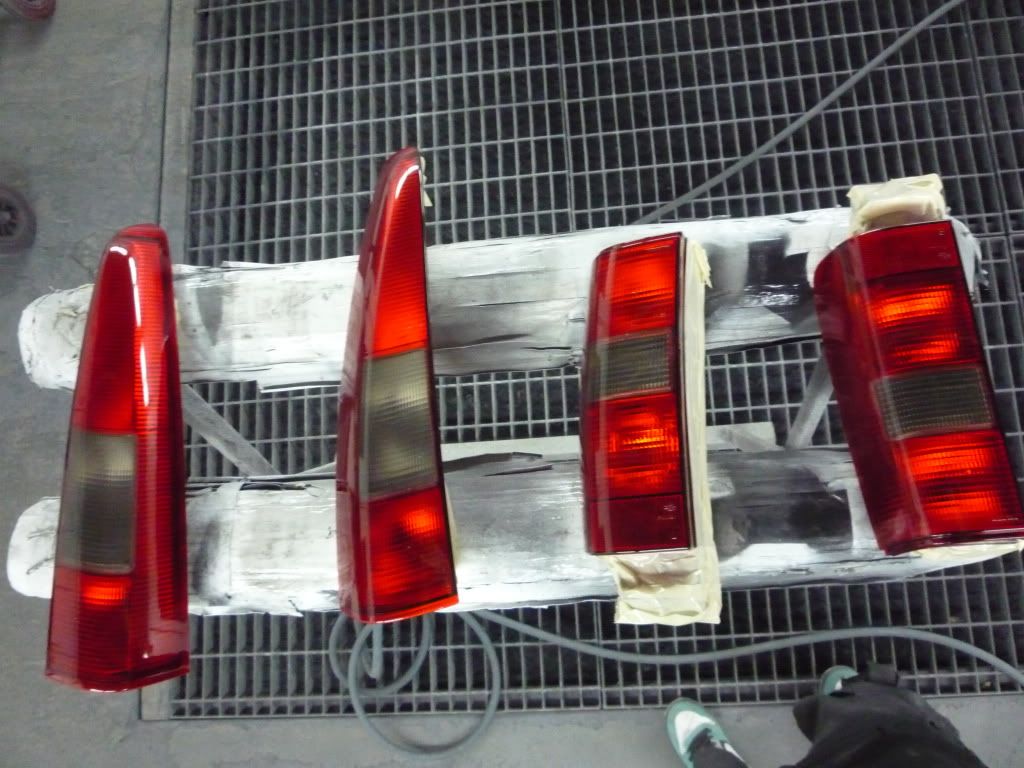 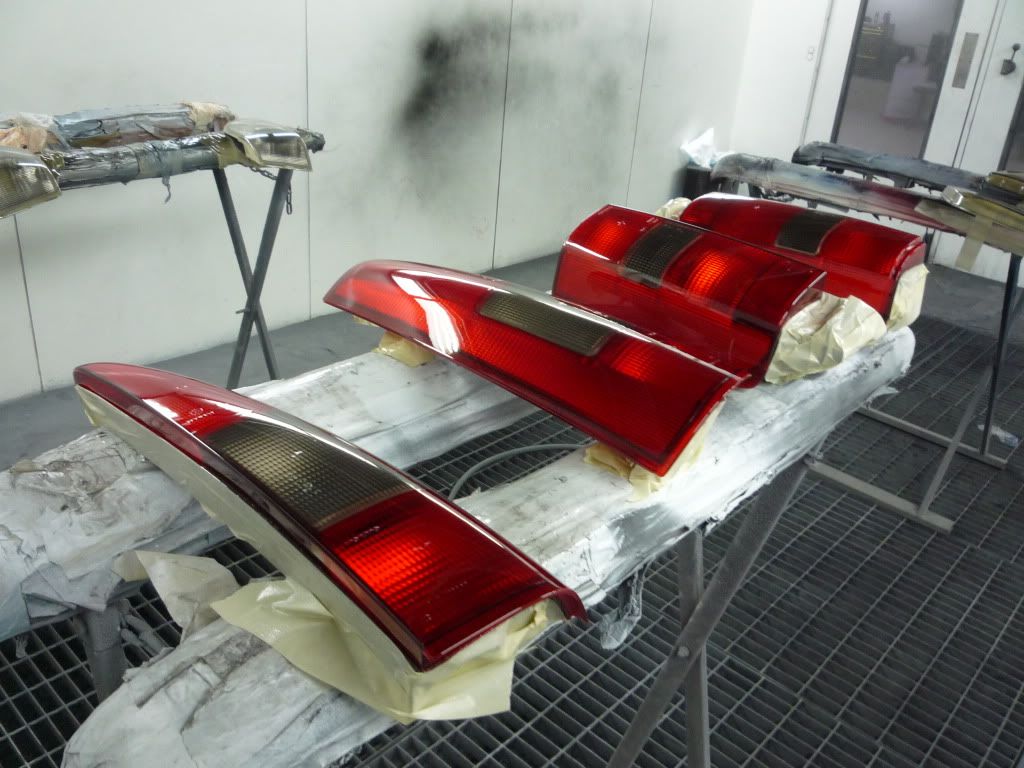 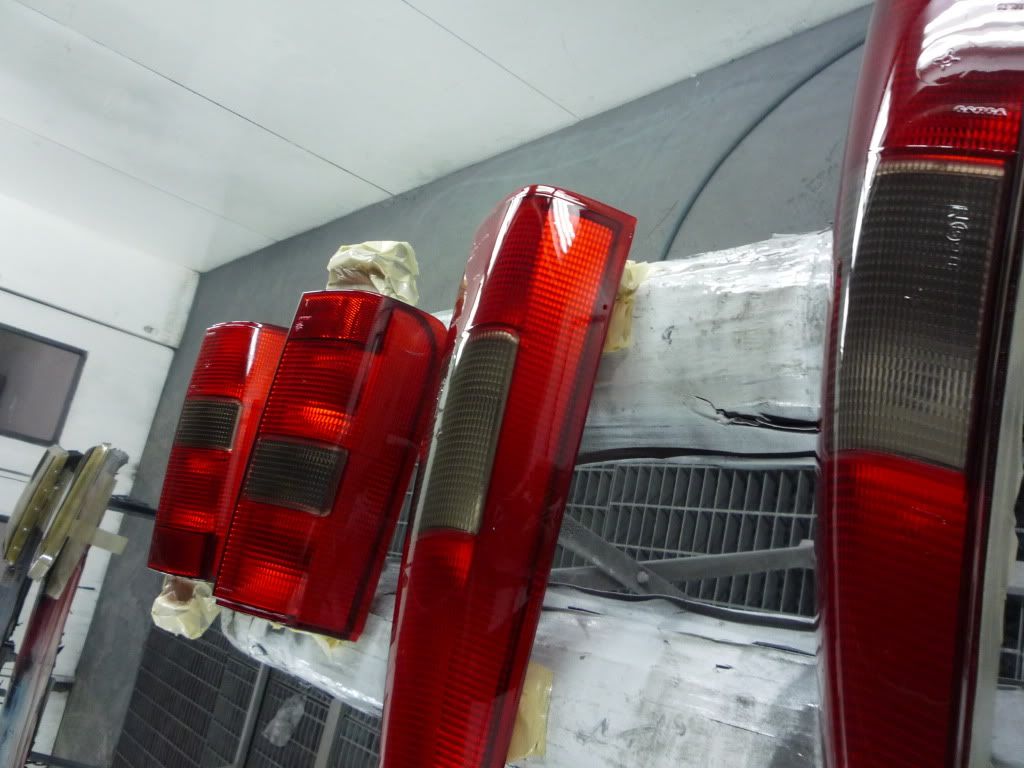 bake in the oven at 60'c then "voila". simple, cheap, effective, different. the headlights are being re-assembled with brighter beams (hid) and will have a look much like the new audi tt etc, grey tinted headlights. also as the lights only need to pass a brightness test when on, they are 100% legal. more project updates to follow with custom splitter salvaged from the farbio scrap parts bin, re-worked rear spoiler and custom gauge pods. |
|
|
|
|
Sep 17th, 2011, 14:47
|
#16 |
|
Member
Last Online: Oct 2nd, 2019 01:52
Join Date: Feb 2011
Location: essex
|
does anyone know of a aftermarket heatsheild for the back bumper of the v70, my exhaust was melting my bumper pre paint and dont want same problem
|
|
|
|
|
Oct 1st, 2011, 10:03
|
#17 |
|
Member
Last Online: Oct 2nd, 2019 01:52
Join Date: Feb 2011
Location: essex
|
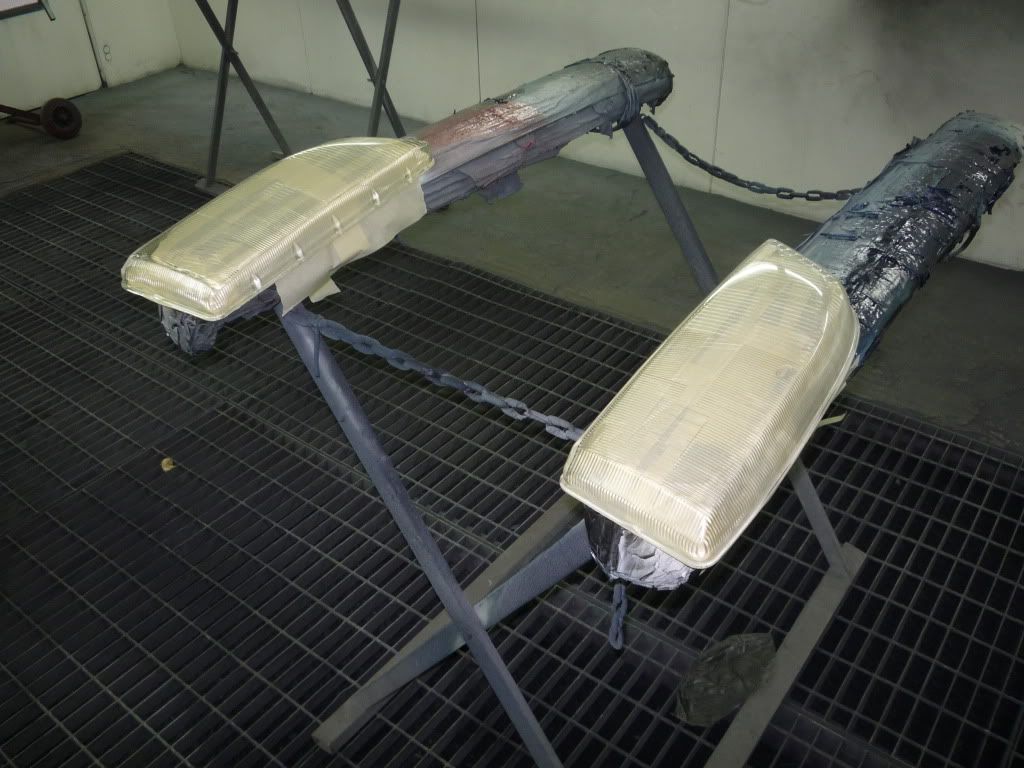
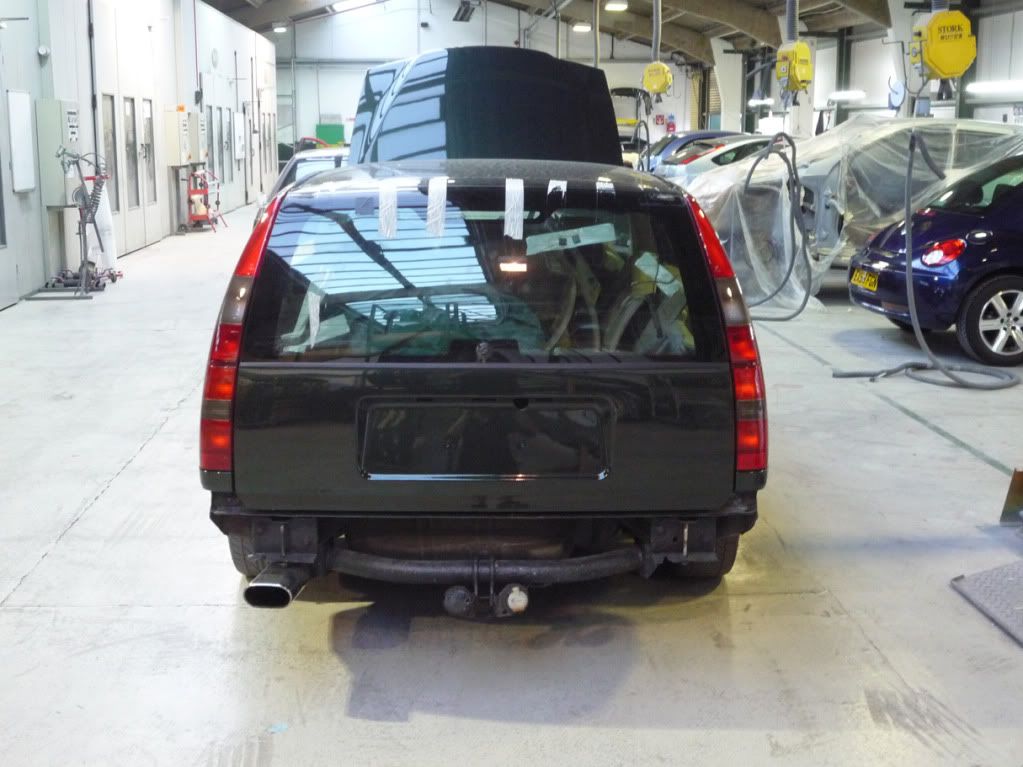
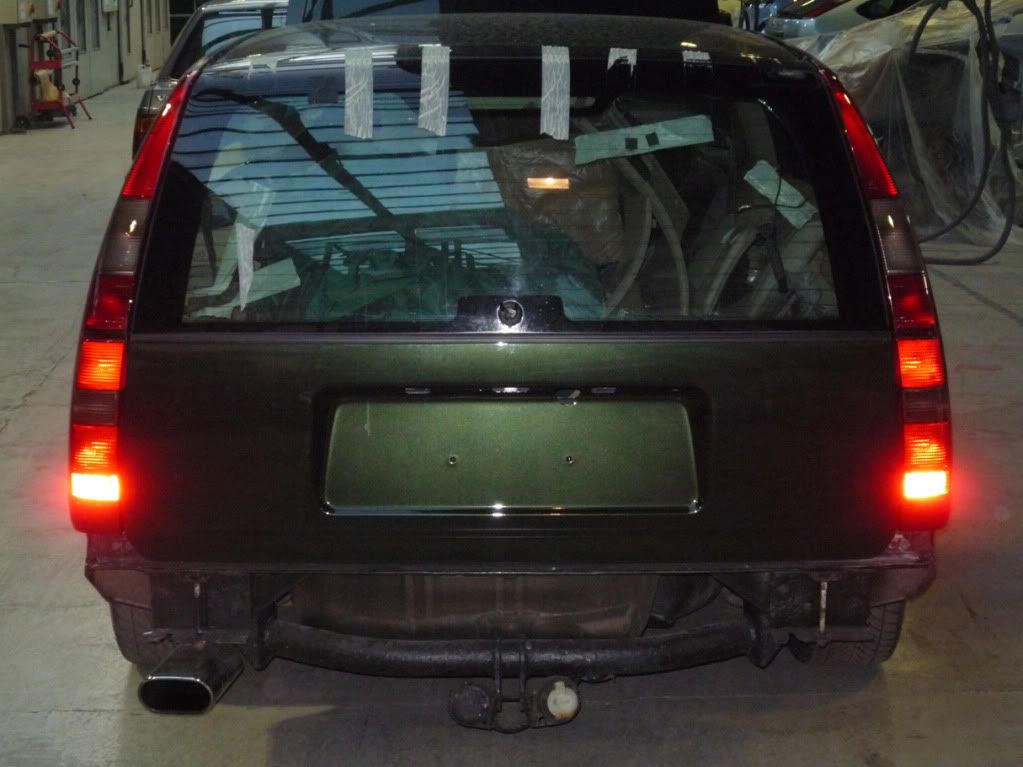
busy week of progress on the T5. some quick pictures of the tinted rear lights i made installed, what do you guys think?
 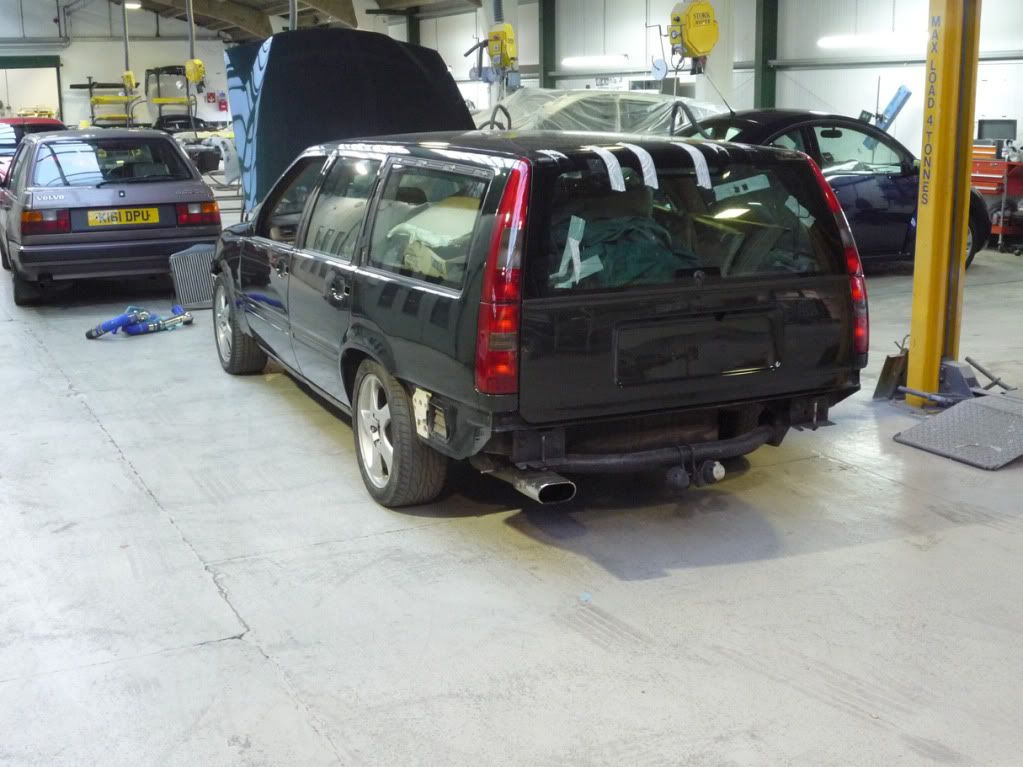  ive also taken the opportunity to fit a bigger intercooler whilst my car is dismantled. i got hold of a THS 3 inch core item from a senoir member on another volvo forum. as luck would have it, my air con condensers had it and the air con rad was accident damage so i removed the air-con system from my car and my god did it make installation simpler. secondly i now have uninterupted airflow to the intercooler which will be far better in the ACT stakes. Old intercooler with aircon removed 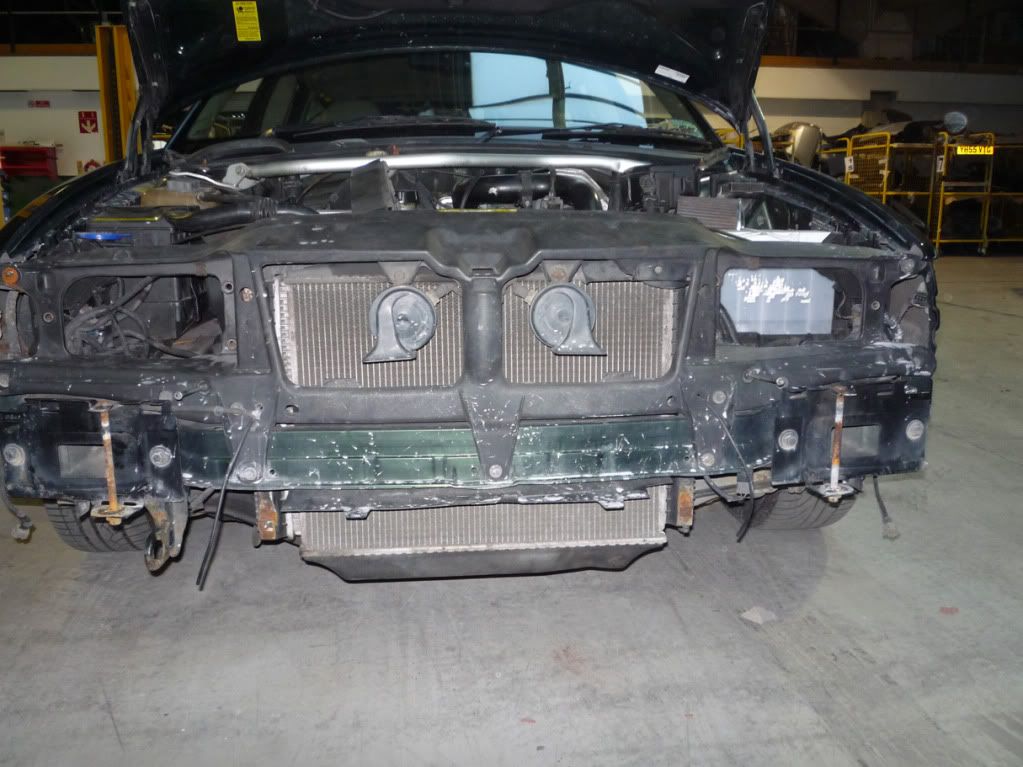 comparison between old and new 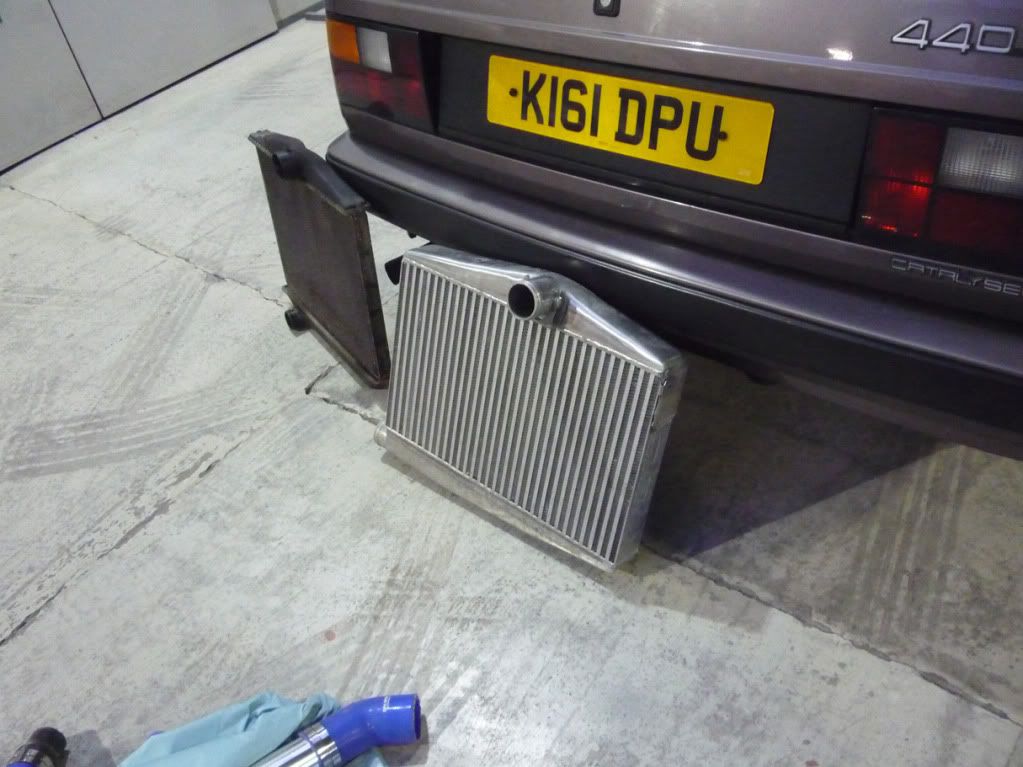 installed (horns relocated to lower crossmember) 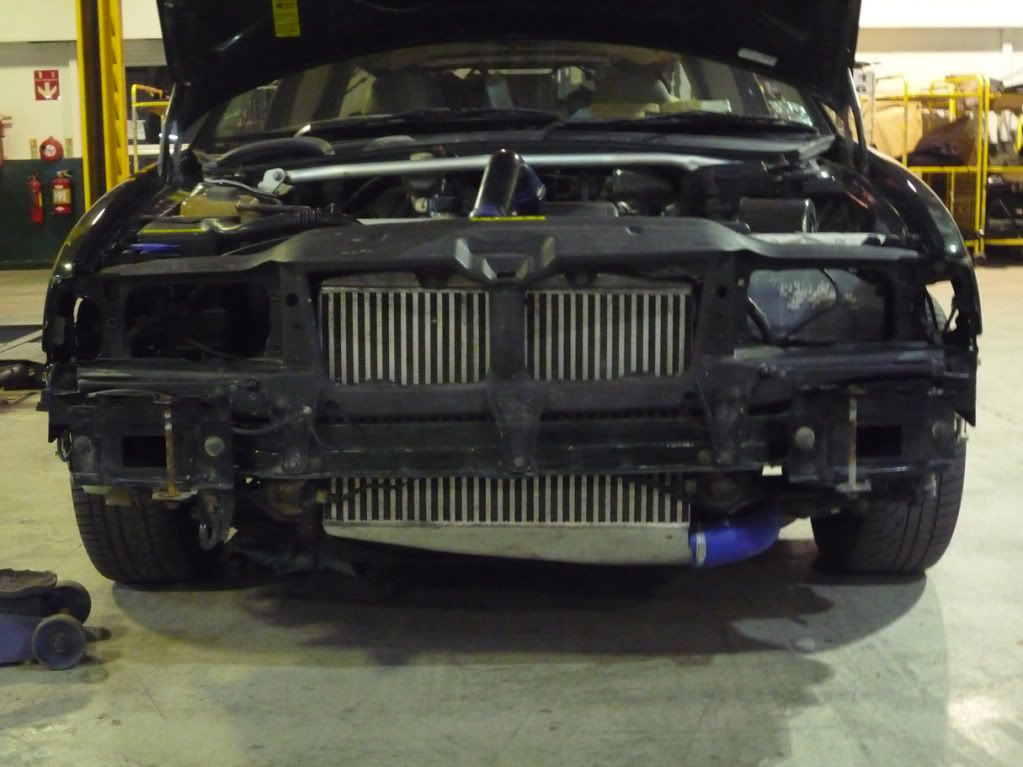 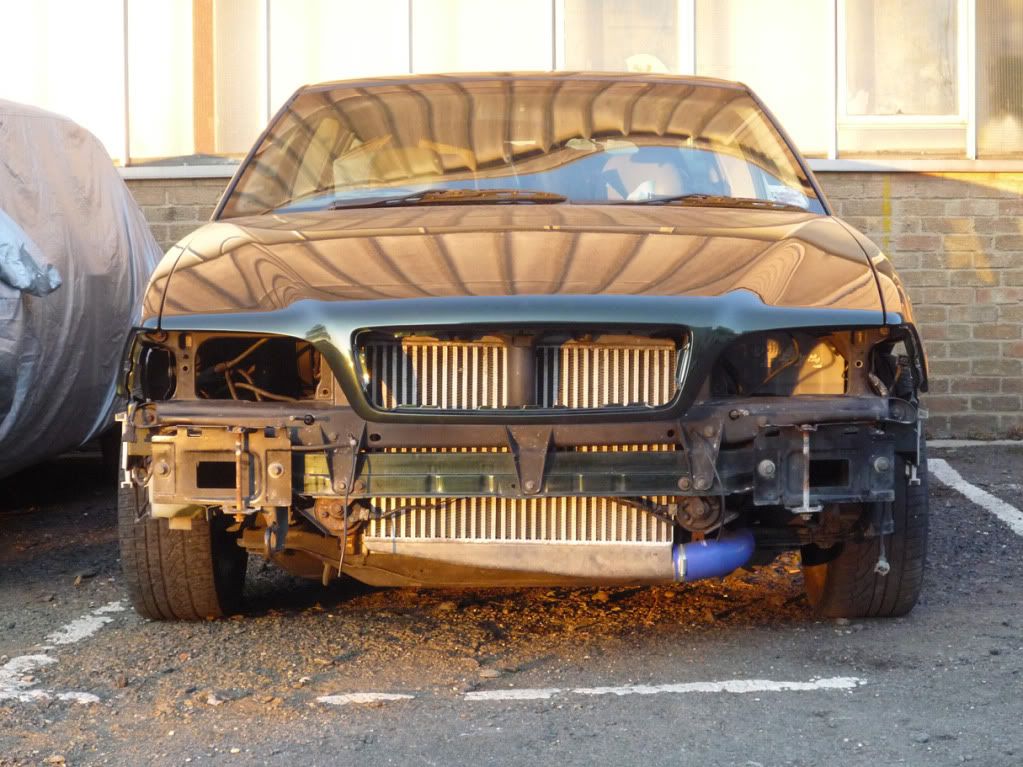 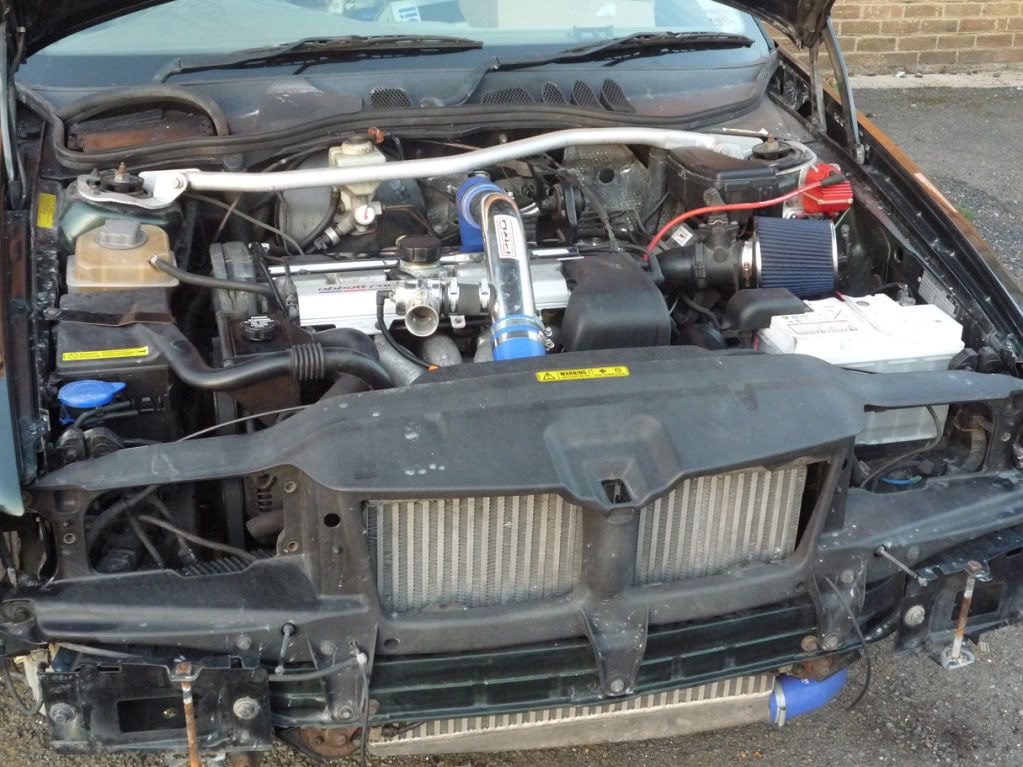 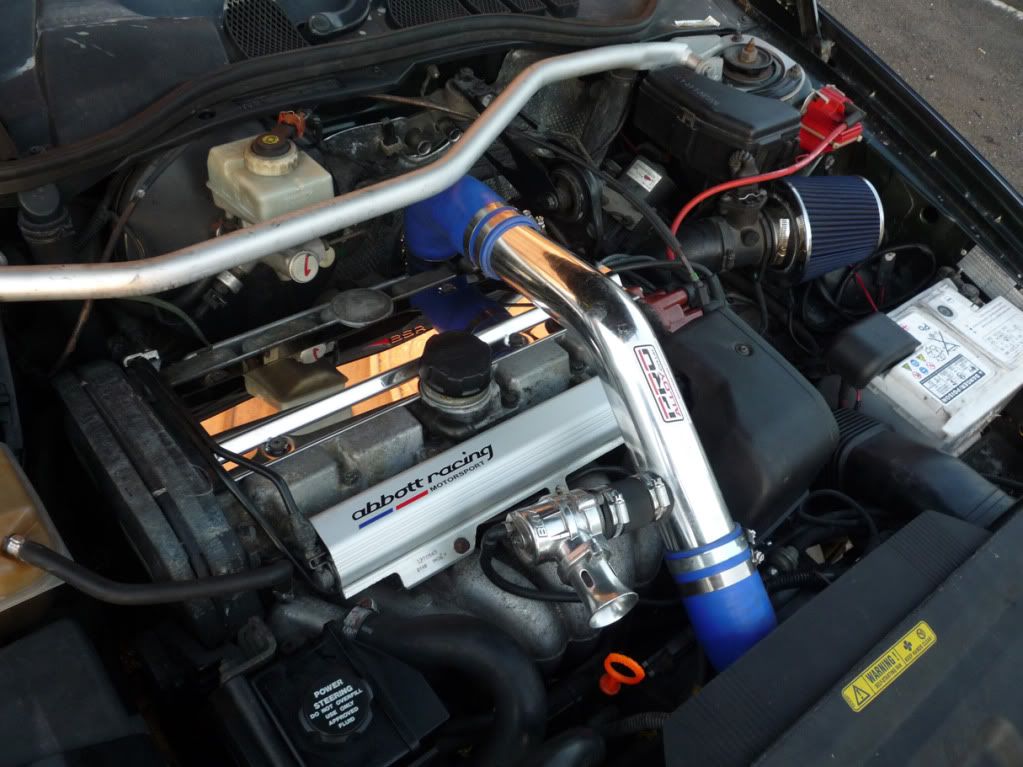 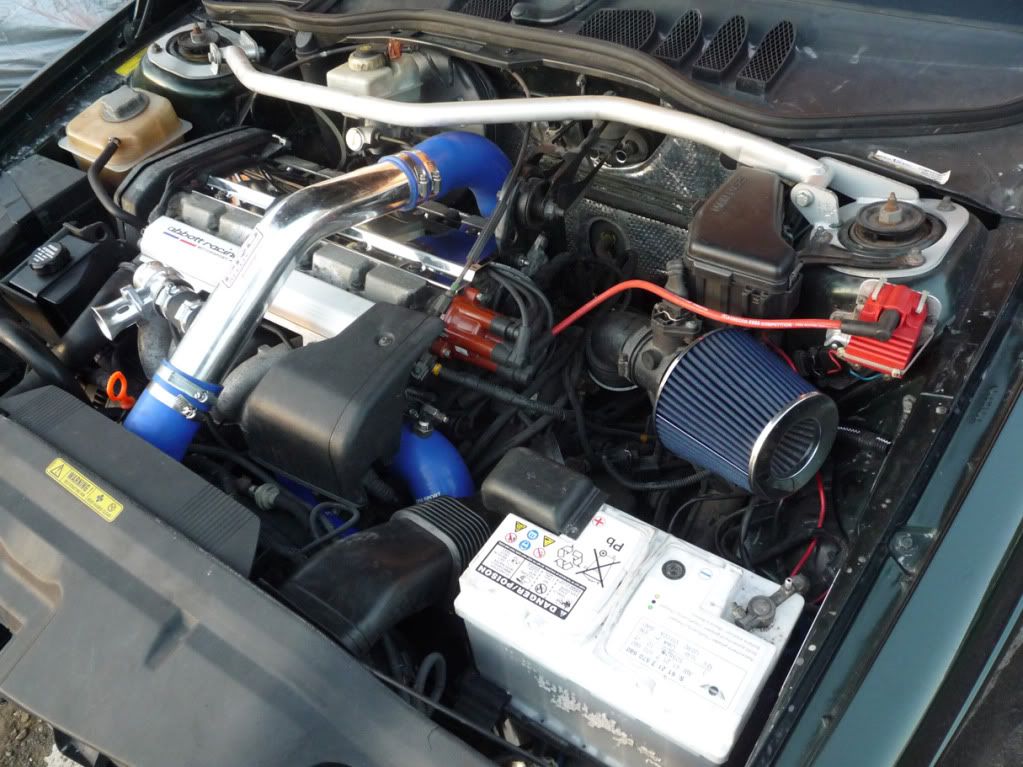 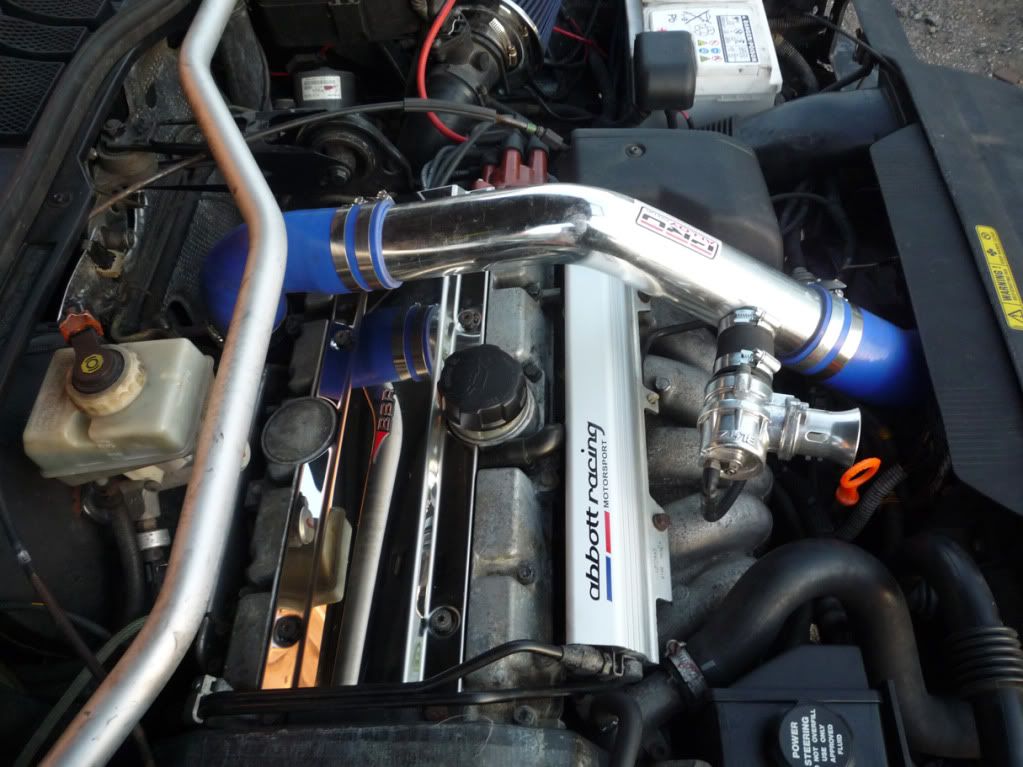 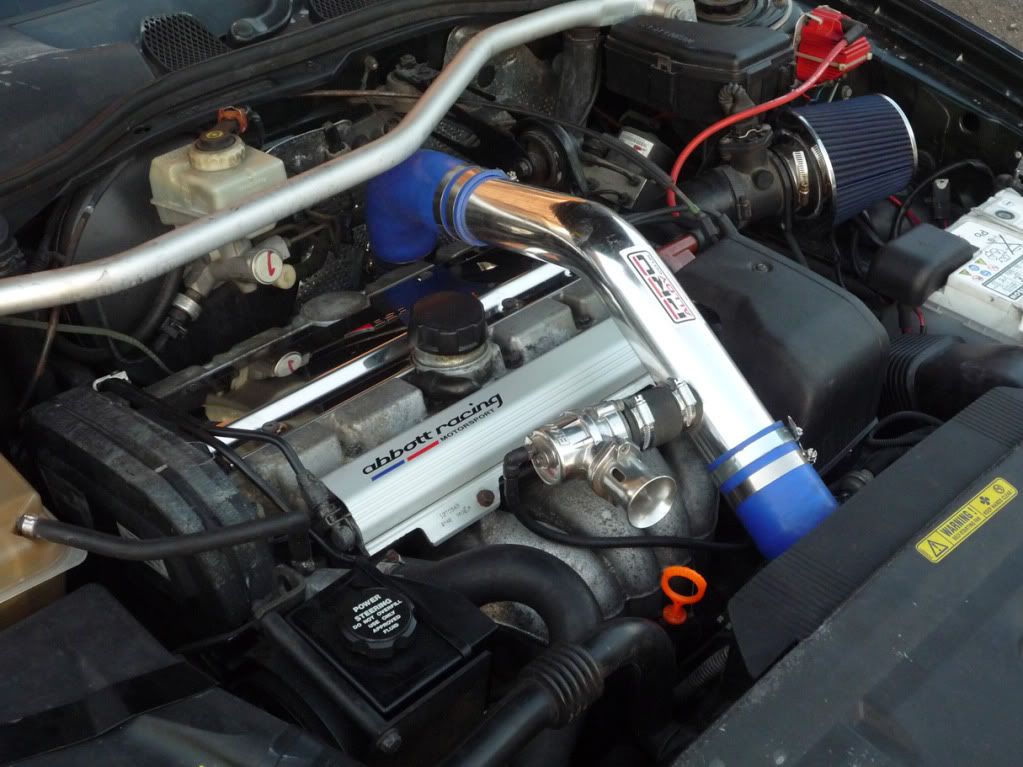 Now the intercooler is in i can put her back together next week. getting there peeps! Gav |
|
|
|
| The Following 4 Users Say Thank You to gavT5 For This Useful Post: |
|
Oct 1st, 2011, 12:43
|
#18 |
|
Aged Volvo Lover

Last Online: Sep 16th, 2021 10:19
Join Date: Jan 2011
Location: A place in mendip-land famous for its cheese - and its gorge
|
Gav.
I still hate you for having such an epic motor! It's looking like the car that I would have with a big lottery win.  All I would add to my 'lottery' car would be 50% window tints (I think 'limo' is too much) and a nice clean Coolant reservoir! (subtle hint  ) )
__________________
Our children don't inherit the world from us. We are borrowing it from them. |
|
|
|
|
Oct 1st, 2011, 19:30
|
#19 | |
|
Member
Last Online: Oct 2nd, 2019 01:52
Join Date: Feb 2011
Location: essex
|
Quote:
yea my header tanks not the cleanest, yet lol, subtle hint taken on board, cleaning one bit highlights the bad bits i never noticed before. the bufty disease may be setting in................ 
|
|
|
|
|
|
Oct 2nd, 2011, 02:08
|
#20 | |
|
Pure is Beautiful

Last Online: Apr 13th, 2021 19:44
Join Date: Nov 2003
Location: UK/
|
Quote:
You're obviously a class sprayer - no wonder your boss let you do it at cost; I don't think he'd want to lose you. Seriously like the use of the TVR lacquer - if it works the same way as the original TVR factory finishes, it should look spectacular in sunlight  You'll know when the disease sets in fully, you'll be changing every (even slightly) rusty screw, nut and bolt you see -I know, I'm currently driving the guys at FRF crazy!! I think I caught it from Scott - damn his perfectionism Cheers, T
__________________
I Think. I Think I Am; Therefore I Am - I Think . . . . |
|
|
|
|
|
| Tags |
| bum warmer, project, rebuild, respray, restoration |
| Currently Active Users Viewing This Thread: 1 (0 members and 1 guests) | |
|
|


 Linear Mode

