
|
|||||||
| S80 '06-'16 / V70 & XC70 '07-'16 General Forum for the P3-platform S80 and 70-series models |
 Information
|
|
Guide: Crankshaft Drive Belt Lip Seal & Decoupler PulleyViews : 2880 Replies : 7Users Viewing This Thread : |
 |
|
|
Thread Tools | Display Modes |
 Jun 13th, 2017, 19:27
|
#1 |
|
Premier Member
Last Online: Jan 3rd, 2024 14:43
Join Date: Feb 2012
Location: Toronto Canada
|
Applies to 3.2L P3 Engine (B6324S2)
I recently discovered that I was losing some oil. I pulled off the undercarriage plate and when I took a peek underneath I immediately had a scare: there was a good amount of fresh oil dripping right down from the seam between the transmission and the engine. I tried to follow the leak upwards but the very crowded engine bay in this 3.2 variant made troubleshooting very difficult. I did manage to spot something from above (but only when I took the air intake hose assembly off): the oil seemed to be accumulating on top of the quick-connect fitting on the lower radiator hose on the drivers side of the engine (part #21 in the diagram here: http://www.volvopartswebstore.com/sh..._driveLine=505 It can just be seen below the AC compressor.  I then took a look at some engine schematics and the only moving part with oil lubrication nearby is the drive/auxiliary belt decoupler which has an oil seal in behind it (part #30711317). If you do some research on the aux belt decoupler like I did, Gates (the original manufacturer) suggests that it has a life expectancy of roughly the same as that of the belt itself (150,000 miles). I mention all of the above because getting at the decoupler is a pain the a$$ but its also an expensive part to replace. Steve H (fellow sweedespeed member) found a link to one that is sold at Advance Auto Parts for a good price: http://forums.swedespeed.com/showthr...coupler-Pulley Some further commentary: removal of the auxiliary belt in the 3.2L engine is not for the faint of heart. Its still very doable but you probably dont want to be doing it again any time soon. As a result, you may want to consider replacing all of the following parts if your mileage is getting close to 150,000 miles: - Tensioner #31401286 - Idler pulley #31401193 - Drive/auxiliary belt #31251046 - Plastic pin in behind p/s pump pulley #30750804 - Water pump coupling (optional) #31219096 - Water pump (optional) #31219000 - AC Compressor clutch (optional) #31267973 - Aux belt decoupler (Volvo does not call this out to be replaced at a specific mileage) #31316803 Job Overview: Duration: Estimated at 3-5hurs High level summary of steps: 1 Remove air intake hose, air filter and housing, and battery 2 Loosen/partially remove belt 3 take AC Compressor off its mounting bolts & suspend 4 Remove the front and side AC compressor support mounts 5 Remove decoupler 6 Pull seal out and replace 7 re-install in reverse order using Volvo tool to fully re-align the AC compressor support mounts Tools/supplies required: - 7mm, 8mm, 10mm, 13mm sockets (3/8), - Lots of 3/8 extensions - 3/8 Flex ratchet - ½ ratchet to operate the alternator decoupler tool - Volvo tool #999-7262 - Alternator Decoupler removal kit (can be purchased from Amazon or Princess Auto) - Broom stick, pucks, strap or equivalent to suspend ac compressor - T25 torx bit - Picks (right angle pic will serve you well) - Container to drain coolant into - New coolant & distilled water if using Volvo coolant - Needle nose pliers (to remove engine shield clips) Step 1: Remove both protective engine shields located underneath the engine (the plastic half-moon shaped one and the cloth one). The front shield is held in place by 8 x T25 screws and three clips with two tabs that must be squeezed together and then pulled to extract. There are two more T25 screws holding the shield to the wheel well covers. The main engine shield is held in place by 8 x T25? Screws (I think). Step 2: Remove a bunch of plastic / Follow steps 1 through 4 of the following guide Note: before you begin, make sure that all windows are up (including sunroof), that car doors are unlocked and that car is not raised to high off ground impeding access to engine bay. http://forums.swedespeed.com/showthr...Engine-B6324S2 Note that Ive since discovered that its a lot easier to access the bottom of the plastic intake hose adjustable clip from underneath the vehicle. Step 3: Take the AC Compressor off its mounting Follow step 6 of the guide referenced in step 2 BUT do not take the clutch off the AC compressor (unless of course you are also replacing the clutch). Step 4: Suspend the AC Compressor using a long rod and some supports It is necessary to lift and suspend the AC Compressor to remove the first AC Compressor bracket and to loosen the other. You can use whatever you have on hand to accomplish this. In my case I used a broom stick, an container of grease and some pucks. This was not ideal as the compressor ended up falling off a few times and I had to walk around the broom stick every time I went from the side of the car to the front but Im sure you get the idea. 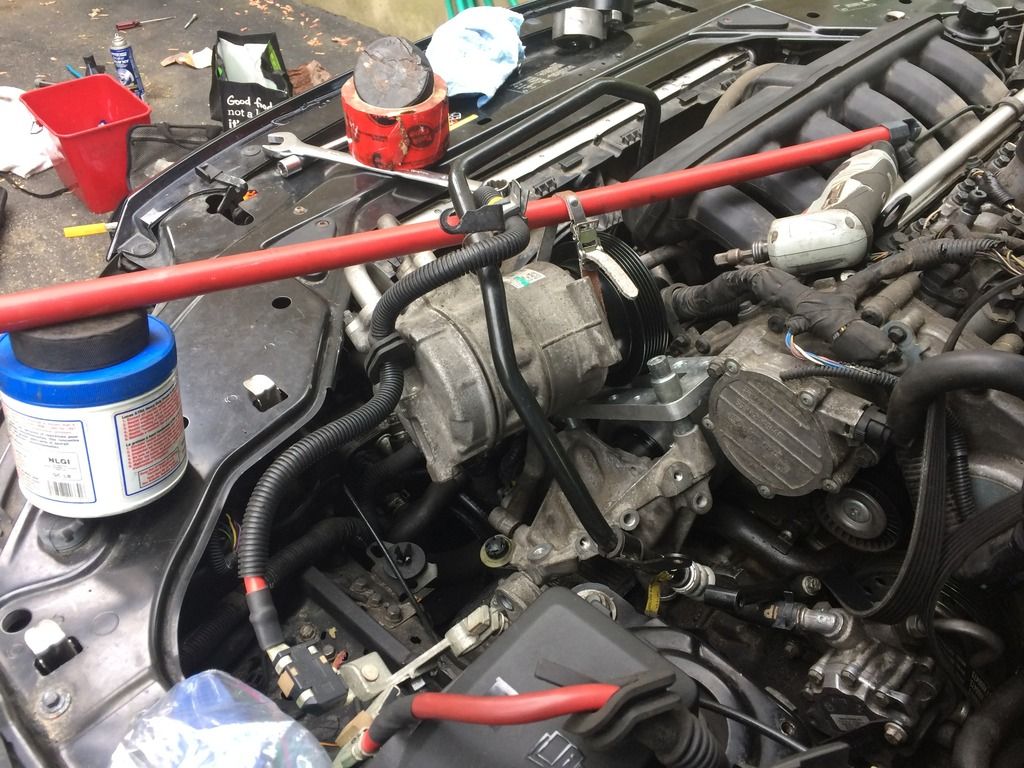  Step 5: Remove the AC compressor bracket located BELOW the compressor. It is held in place by two bolts. The first is located at the very bottom of the bracket dead centre (13mm socket). The second is located to the side (10mm socket). I was able to get the bracket out without removing the belt tensioner BUT I ended up having to take the tensioner off in the end to allow for volvo alignment tool installation. Since its a bit of a nuisance to get the bracket out with the tensioner installed save yourself some future frustration and remove the tensioner now. Its held in place by a single 10mm bolt located on the inside of the bracket itself. More detail can be obtained in step 7 of the guide referenced in step 2.   Step 6: loosen but do not totally remove the vertical bracket It is held in place by 4 bolts (2x13mm lower bolts, 2x10mm upper bolts). You will also need to remove a 8mm screw and cable bracket that is attached to the compressor bracket itself in order to get yourself some additional wiggle room.   Step 7: Remove the decoupler pulley Select the tool from the decoupler kit that fits both the bolt on the inside of the decoupler and the notched opening on the outside of the decoupler. The outside piece is a counterhold use a wrench to hold it in place while you unscrew the bolt.   Step 8: Remove the lip seal in behind the decoupler Clean the area surrounding the seal thoroughly before attempting the remove the seal. Use brake cleaner as needed. Take note of the depth of the seal in the opening as you will be looking to reinsert the new seal to approx. the same depth. To remove the seal insert a right angle pick into THE CENTER of the seal not the outside of the seal. The centre has a thinner plastic lining that can be pierced more easily. Once the pick has been inserted simply pry the seal out. Be sure to put some heavier gloves on for this part just in case your hands jerk back and get ripped to shreds by a sharp edge. Prepare the seal by lightly oiling it. Gently insert it over the crankshaft and put it in place without pressing in. Find a large socket (I think I used a 1 variety) or plumbing fitting that fits over the seal as close as possible to the edge without touching the edge. Use this as a drift to carefully knock the seal into place making sure that seal is going in evenly all the way around. Take your time, checking after every couple of taps. Run your finger around the opening to verify that seal seems to be going in flat. Take your time, this is the whole point of all this work!  Step 9: Drain coolant Sidenote: Im pretty sure that this part is only required if you decide to use the Volvo alignment tool to re-align the brackets under the ac compressor. Volvo instructions specify that this drift must be used anytime either of the two brackets has been loosened. A fellow forum member has successfully completed this job without using the drift and it meant very carefully re-installing all bolts on both brackets (7) at the same time tightening each progressively until it all comes together. I think this works fine, but I just dont know for sure. The tool is $200CAD and will guarantee that the alignment of the AC compressor is perfect and will make the job of re-installing the bolts a little easier. Your call. If you opt not to use the tool, you do not need to make room for the drift and you dont need to drain the coolant. Heck, Im not 100% sure that you cant get the drift in place without draining the coolant. I didnt think to hard about it as I needed a coolant change anyway. The coolant drain is located on the drivers side of the radiator. There is also a plastic drain screw right next to it. Take a short length of hose (3/8 I think) and fasten it to the drain. Direct it to a jug or container to catch the coolant. You will need a container with a capacity of about 7L. Turn the drain screw about 90deg (you may need to use a small set of pliers to loosen the plastic drain screw but be careful not to bust it). It will take about 5min for all fluid to drain. Tighten the drain screw back in and you are all set to continue. Step 10: Disconnect 2x coolant hoses to make room for Volvo alignment tool As noted in step 9 you only need to do this if you are using the alignment drift. There are two connections on the lower radiator hose that need to be disconnected to make room for the drift. The order in which they are removed is important just to make the job easier. Select the connection that requires you to lift the metal retaining spring to disconnect. I had some trouble with this. You need to make sure that you can keep the spring fully lifted while you attempt to pull the two hoses apart. Hard pulling with some side to side wiggling will get it partially disconnected. Once the honeycomb plastic is visible carefully insert a flathead screwdriver in there to fully pry the two hoses apart. When re-connecting these two hoses later I had just as much difficulty and ended up using a set of channeloc pliers to push the two hoses back together (again, very carefully). The second connection is also a pain. It requires that the grey plastic retaining ring be twisted about 45deg counter-clockwise for the hose to disconnect from the metal hose on the block. I tried this a few times but could not really get my hands in there do pull this off. Instead, I had good success by twisting the entire hose clockwise and THEN I held the grey piece in place as I rotated the hose counterclock-wise back in place. Once the grey piece has been full rotated the hose should come out relatively easily. To re-install this fitting later, align the grey piece in the closed position BEFORE installing the hose and then push the hose in until you hear/feel a click.    Step 11: Re-install the decoupler pulley Use the same two items from the decoupler removal kit to re-install the pulley. It needs to be torqued to 60Nm. Be sure to firmly hold the counterhold in place so that the pulley itself does not take any of the load. Step 12: Re-install the compressor bracket (without the tensioner in place). Step 13: Install the volvo tool and secure the two compressor brackets Make sure you are not already tired and or impatient when you undertake this task. The jig is a bit challenging to get in place. To insert it make sure that the piece that will be placed around the pulley is loosened to the maximum setting and make sure that you pull the pieces apart. Insert the tool from the rear (as in come at it from the direction of the power steering pulley). A couple of important notes about the tool: 1) The two metal cylinders on the tool itself must slide freely in their openings. If they do not and you install the tool anyway, you will have a devil of a time connecting the tool to the ac compressor bracket. One of mine did not and I lost about 90min first installing the tool and then realizing the issue only to have to sand the cylinder down so that it would fit smoothly. I ended up lightly greasing both cylinders to be sure they moved freely. 2) The two metal cylinders must be placed in the tool in the right direction for the tool to sit properly on the compressor bracket. The side with the inner lip must face downwards this lip will mate with the raised lip on the ac bracket ensuring a perfect fit. 3) There are two long locator screws on the tool itself. These are supposed to be used to hold the tool in place once you have successfully positioned it on the ac compressor bracket. My observations suggested that the screws are not really necessary: if the tool is seated on the bracket as designed the screws dont accomplish anything more. I say this because I had some challenges getting the lower screw on (there just isnt much room next to the ac clutch). I compromised and put the top screw in and left the bottom one out. To get the tool in, it may be valuable to have a helper on hand. It requires that the ac compressor be held in place as high as possible for an extended period of time. I was able to pull this off making sure that I had extra pucks on hand that I shoved in to suspend the compressor even higher. Once the tool is in place resting nicely over the pulley AND nicely settled into the compressor bracket, tighten the 19mm bolt until it is no longer possible to move the jig back and forth or up and down. The concept in getting the right alignment is that the bolts on the brackets need to be tightened in a certain order. First, re-install all bolts hand-tightened (4 on the lower bracket and 2 on the upper bracket). Once all are in place AND verifying that the compressor bracket is still sitting firmly in the tool, tighten the centre bolt of the top bracket to 50Nm. Then tighten the side bolt 24Nm. Then tighten the bottom two bolts of the lower bracket to 50Nm. Lastly tighten the top two bolts on the bottom bracket to 24Nm.    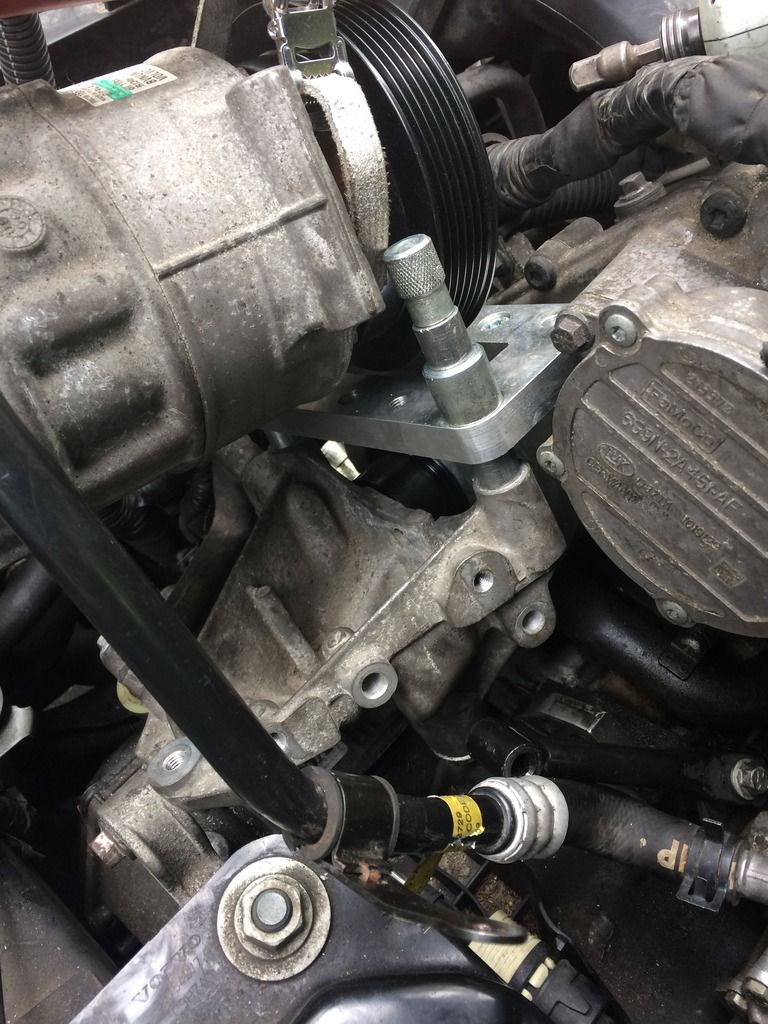  Pat yourself on the back, you are now in the home stretch! Double check that the black metal bracket that connects the power steering pump to the ac compressor top bracket is aligned. Re-install the small 8mm screw on the bottom bracket that secures the cable guide to the bracket. Re-connect the two coolant hoses at this point when you have maximum access to the area. See tips for re-installation in step 10. Step 13: Re-install the tensioner and the belt I struggled with this part as I couldnt not understand how to get the belt back on without leaving the ac compressor off its bracket and wrapping the belt around that component last. For what its worth, I re-installed the tensioner (10mm bolt 24Nm) making sure that the belt was correctly placed above the pulley. I placed the retention pin in the side of the tensioner. I left the ac compressor off its mountings and angled inwards and left the belt off the compressor clutch. I looped the belt around all other components and then shimmied it over the clutch. Then and only then did I move the ac compressor back onto its mounting points. Im not certain the way I did this was the best way but it eventually worked. It might have made more sense to remove the idler pulley and then reinstalled it last when the belt was looped around the other components. Take the pin out of the tensioner and verify that the belt sits snuggly on all components. Tighten the bolt on the power steering pump bracket where it connects to the ac compressor bracket (24Nm) its a black bolt with a 10mm head. Follow steps 15 to 19 in the guide referenced in step 2. Verify that all the items have been re-installed (remember to re-install the black plastic bracket which holds the ac pipes in place at front of engine). Step 14: Refill coolant Fill to max level with 50/50 mix of volvo coolant and distilled water. Fill to the brim (past the max line) Turn engine on for a few minutes. Refill with coolant (to the brim). Repeat. Take it for a longer ride (long enough for the thermostat to open up) fill to max. Take it for another long ride, check level again. It took two long drives for mine to finally stabilize at max level. Admire your handiwork, youve saved yourself a fair amount of $!
__________________
2003 V40 1.9T B4204T4, 197,000miles (sold but alive!), 2004 S60 2.5T, 160,000miles, 2010 V70 3.2, 125,000miles, 2002 V70XC 2.4, 175,000miles  Click here for my x40 and V70 P3 repair guides |

|

|
| The Following 4 Users Say Thank You to pierremcalpine For This Useful Post: |
|
Jun 13th, 2017, 20:24
|
#2 |
|
Junior Member
Last Online: Oct 25th, 2019 18:35
Join Date: Apr 2017
Location: Leicester
|
Crickey!..... What took longer the job or the post
__________________
V70 SE LUX 2011, 205hp, manual |
|
|
|
| The Following User Says Thank You to Splodger For This Useful Post: |
|
Jun 13th, 2017, 23:14
|
#3 |
|
Premier Member
Last Online: Yesterday 06:32
Join Date: Feb 2009
Location: Salisbury (ish)
|
So hoping I don't ever have to do this on mine. I've used about 1.5 litres of oil in 15,000 miles which I'm hoping is just normal usage rather the leaking.
|
|
|
|
|
Jun 14th, 2017, 14:47
|
#4 | |
|
Premier Member
Last Online: Jan 3rd, 2024 14:43
Join Date: Feb 2012
Location: Toronto Canada
|
Quote:
Honestly the job isn't that bad. You don't want to be in a rush though... If anyone ever needs the alignment tool or the decoupler removal gizmo, message me. Happy to loan it out as long as you commit to shipping it back to me (still cheaper than buying the tool).
__________________
2003 V40 1.9T B4204T4, 197,000miles (sold but alive!), 2004 S60 2.5T, 160,000miles, 2010 V70 3.2, 125,000miles, 2002 V70XC 2.4, 175,000miles Click here for my x40 and V70 P3 repair guides |
|
|
|
|
| The Following User Says Thank You to pierremcalpine For This Useful Post: |
|
Jun 14th, 2017, 14:52
|
#5 |
|
Premier Member
Last Online: Jan 3rd, 2024 14:43
Join Date: Feb 2012
Location: Toronto Canada
|
I should also add that while all this stuff is out - be sure to inspect your brake vacuum pump and the power steering high pressure hose for leaks. My p/s hose started to leak about 10K ago right at the metal compression seam as the hose heads down behind the engine.
__________________
2003 V40 1.9T B4204T4, 197,000miles (sold but alive!), 2004 S60 2.5T, 160,000miles, 2010 V70 3.2, 125,000miles, 2002 V70XC 2.4, 175,000miles Click here for my x40 and V70 P3 repair guides |
|
|
|
|
Sep 8th, 2019, 18:44
|
#6 |
|
Premier Member
Last Online: Jan 3rd, 2024 14:43
Join Date: Feb 2012
Location: Toronto Canada
|
Video created as I had to go back in and replace the leaking seal. My experience suggests that you MUST use the volvo tool to press the seal back in.
https://youtu.be/9p8tRqaEWls
__________________
2003 V40 1.9T B4204T4, 197,000miles (sold but alive!), 2004 S60 2.5T, 160,000miles, 2010 V70 3.2, 125,000miles, 2002 V70XC 2.4, 175,000miles Click here for my x40 and V70 P3 repair guides |
|
|
|
|
Feb 23rd, 2023, 13:24
|
#7 |
|
Member
Last Online: Yesterday 17:53
Join Date: Jan 2013
Location: London
|
Pierremcalpine, great write up and photos thanks, do you know if the xc90 (2007/3.2/has the adjustable AC compressor bracket, I didn't really take note when I replaced the idle pulleys last time, I'll check agin and report back, seemd to be a different bracket set up to the V70?. PS that thing must shift with the turbo 6 in it!!!
|
|
|
|
|
Feb 23rd, 2023, 15:49
|
#8 |
|
Premier Member
Last Online: Jan 3rd, 2024 14:43
Join Date: Feb 2012
Location: Toronto Canada
|
I dont, sorry.
__________________
2003 V40 1.9T B4204T4, 197,000miles (sold but alive!), 2004 S60 2.5T, 160,000miles, 2010 V70 3.2, 125,000miles, 2002 V70XC 2.4, 175,000miles Click here for my x40 and V70 P3 repair guides |
|
|
|
|
| Tags |
| crankshaft, decoupler, drive belt, lip seal, oil leak |
| Currently Active Users Viewing This Thread: 1 (0 members and 1 guests) | |
|
|


 Linear Mode

