
|
|||||||
| x40 S1 Articles Article posts pertaining to x40 S1 Articles series Volvos |
 Information
|
|
How to Replace the Hazard Light SwitchViews : 21231 Replies : 23Users Viewing This Thread : |
 |
|
|
Thread Tools | Display Modes |
|
|
 Dec 30th, 2011, 19:19
|
#1 |
|
Premier Member

Last Online: Nov 15th, 2022 21:34
Join Date: Apr 2010
Location: London / Essex
|
Here we go with another guide requested. It is for a small part of the car, but it seems that many people have been having problems with their Hazard Light Switch.
There are 2 ways to remove the Hazard Light Switch. I have followed both ways and posted photos so you can choose whichever you think is easier to follow First of all remove the fascia form the heater control panel. I use my Leatherman blade to prise it off from one side and then the other.  Undo all four screws  The Heater Control Unit is also secured by this clip on that slot. To remove the Heater Control Unit you need to push it in slightly and it will prise off easily. Pay attention when you put everything back together as you must make sure you secure it back the correct way.  There are two connectors plugged in the Heater Control Unit. Best way to remove it is to push it in diagonally and unclip the first connector.  You can then remove the Heater Control Unit partially outwards and unplug the second connector  Now here is where there are two ways to do it. I personally use the first method, as I am used to it and I know where and what the parts look like. Method 1 Put your hands in there and try to feel the two clips securing the Hazard Light Switch. See the next two images to get an idea of what you should be feeling for.  You need to push the two clips gently inwards and push the Hazard Light Switch inwards  A close up:  You will need to wiggle out the switch so it is in this position. Then you can easily unclip it and replace it with your new switch.  Method 2 This is the method I used the very first time I had to replace my Hazard Light Switch. It is a lot more trickier in my opinion and you face a small risk of breaking something, or losing small bits. You will need to remove both vents. Again, I used my trusted Leatherman to prise off each vent.  This is a bit tricky too if it is the first time you have ever tried it. You need to push those clips downwards. See also next photo. The best way I found out is to do the right side one first and pull the fascia outwards and then do the left hand side one   Then you just pull out the fascia outwards and very easily disconnect the Hazard Light Switch and replace it with the new one  JOB DONE And here are some close up images of the switch. If you want to take it apart to try to repair it, you need to push in this clip and do the same on the other side   This small metal bit is the one moving from left to right locking and unlocking the Hazard Light Switch. The tip of it moves in some grooves which makes it move from left to right. I have tried in the past to repair an old Hazard Light Switch I had but had no luck whatsoever with it. 
__________________
Current car: 2002 S40 1.9D, 1992 240SE Nullius in Verba
Last edited by gatos; Dec 30th, 2011 at 19:45. |

|

|
| The Following 18 Users Say Thank You to gatos For This Useful Post: |
|
Dec 30th, 2011, 19:27
|
#2 |
|
Young Volvo driver

|
Yet another superb guide. Since this seems to be a common fault this will be very helpful for those wanting to fix it ( like me )
Thanks Gatos for taking the time again to do the guide 
__________________
 "In order to succeed, your desire for success should be greater than your fear of failure. Bill Cosby" |
|
|
|
|
Dec 30th, 2011, 19:40
|
#3 |
|
Premier Member
Last Online: Nov 15th, 2022 21:34
Join Date: Apr 2010
Location: London / Essex
|
I tested the 4 hazard light switches I had and 3 of them were fine. The 4th one was stuck and that is the one I took apart.
One of them is yours Volvo2002, and I need to find out who was the other person who asked me for one.
__________________
Current car: 2002 S40 1.9D, 1992 240SE Nullius in Verba
Last edited by gatos; Dec 30th, 2011 at 19:44. |
|
|
|
|
Dec 30th, 2011, 19:44
|
#4 |
|
Master Member
Last Online: Dec 31st, 2016 22:43
Join Date: May 2011
Location: JER
|
Thanks CAT MAN
|
|
|
|
|
Dec 30th, 2011, 20:01
|
#5 |
|
Winegrover
Last Online: Jul 17th, 2019 11:08
Join Date: Nov 2009
Location: Slovenska Bistrica
|
I like it
It seems those plastic or metal things, moving left and right, are common weak points for generally all push-switches. |
|
|
|
|
Dec 30th, 2011, 19:47
|
#6 | |
|
Young Volvo driver
|
Quote:

__________________
"In order to succeed, your desire for success should be greater than your fear of failure. Bill Cosby" |
|
|
|
|
|
Dec 30th, 2011, 19:53
|
#7 |
|
Member
Last Online: Dec 3rd, 2014 18:22
Join Date: Nov 2011
Location: paraparaumu new zealand
|
hey alex , i notice your toolkit seems to use the leatherman a lot .....im happy to send you over a small flat bladed screwdriver !!!!
cheers from NZ
__________________
1998 s40 1.8 auto (silver) Volvo motor |
|
|
|
|
Dec 30th, 2011, 20:06
|
#8 | |
|
Premier Member
Last Online: Nov 15th, 2022 21:34
Join Date: Apr 2010
Location: London / Essex
|
Quote:
 Since then, I have learned how to use it a lot more carefully
__________________
Current car: 2002 S40 1.9D, 1992 240SE Nullius in Verba
|
|
|
|
|
|
Mar 27th, 2014, 23:12
|
#9 |
|
New Member
Last Online: Mar 27th, 2014 23:20
Join Date: Mar 2014
Location: City
|
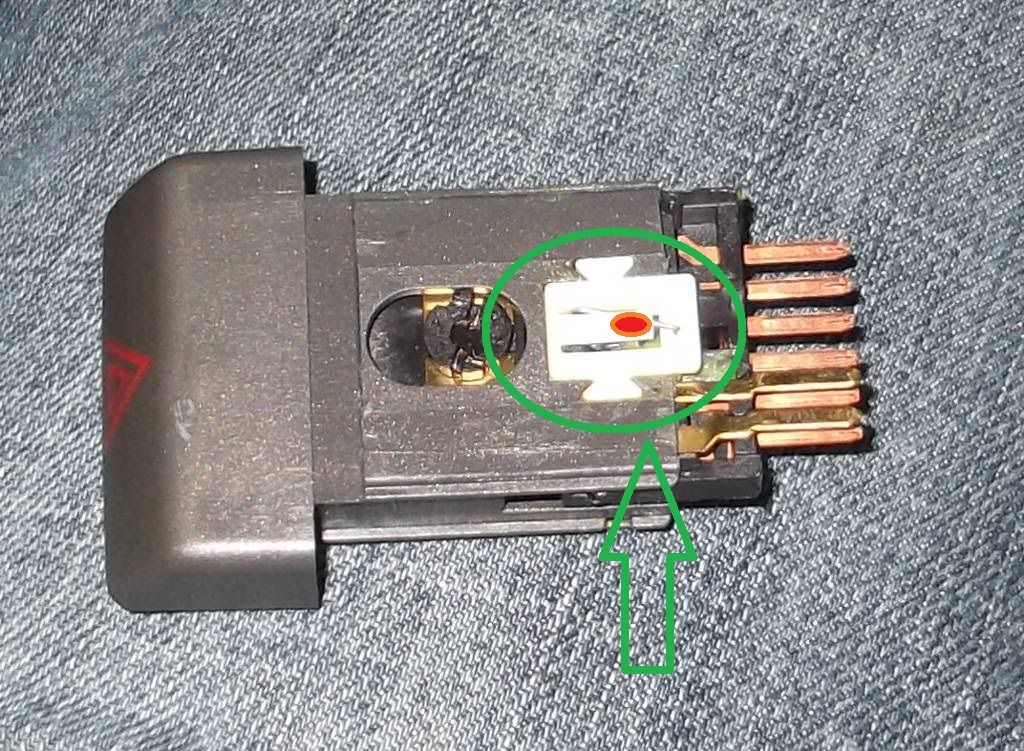
Thanks for the guide! I used it to extract and disassemble the hazard light switch. The problem with my switch was that the toggle was not locking positions on the switch when you push the button and it would just remain in the "on" position and not switch to the "off position." To fix this, I applied a dab of epoxy to the off-white component so that when in the housing, it would push the plastic down onto the metal clip more which gave it the downward force the metal toggle needed to switch positions when you push the button. I didn't take a picture but I marked the spot (orange outline with red fill) where I applied the epoxy on the photo.
|
|
|
|
| The Following 2 Users Say Thank You to qkarolus For This Useful Post: |
|
| Currently Active Users Viewing This Thread: 1 (0 members and 1 guests) | |
|
|


 Hybrid Mode
